This is a question that was left on our video about Understanding Ease, and it required a little more conversation, so here are some options to consider when choosing a size for hips that are significantly wider than your bust.
Q: What if you have hips that are 7 inches larger than your bust?….How do you select the size to choose when most patterns have just the bust measurement?
A: This is a common problem for many of us, and one of the reasons why it’s important to know all of your measurements.
The thing to remember is that sweaters hang from our shoulders, not our hips, so to keep a nice looking upper body in our sweaters, we need them primarily fit our bust and shoulders. If you’re knitting a pattern that’s very oversized—say 10″+ of ease—you can just knit the pattern as written for your bust or preferred fit.
If you’re looking to knit a more fitted piece, such as Kai, you’ll need to work adjustments. The first thing to do is look at the schematic for the garment. Here’s the schematic for Kai (if you’re making a garment and it doesn’t have a schematic… you may want to choose another pattern—any reputable knitting or crochet pattern will have a schematic with it).
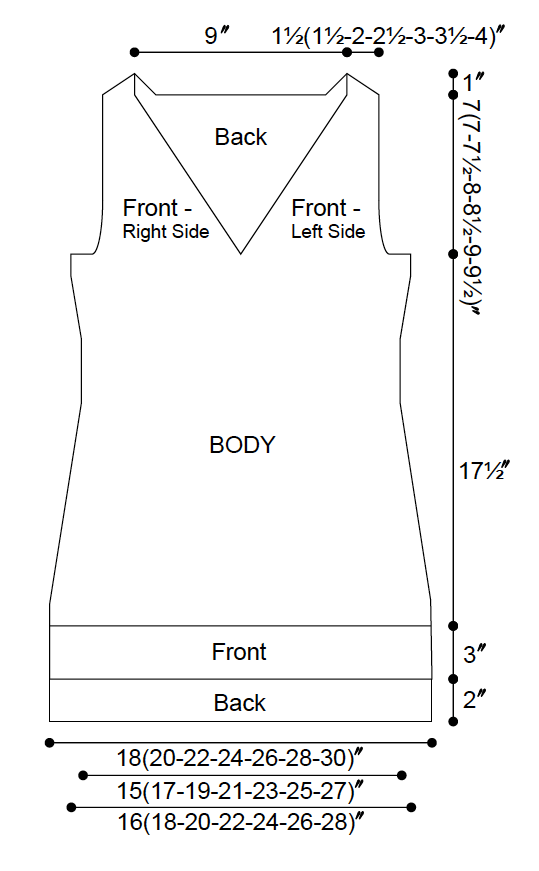
You see it lists three width measurements at the bottom, with corresponding dots. The tank is knit flat at first, before being joined in the round, so the numbers are HALF of what the finished measurements would be. The very bottom number lists the bust measurement. The numbers at the top of that column are the hip measurements. I’m going to double those numbers, so the hip measurements for Kai are 36(40-44-48-52-56-60)”. They’re about 4″ more than the bust measurement, so if you were going to knit this and you had a 7″ differential between your bust and your hips, you’d have 3″ to create somehow. Here are a few options.
1) Sticking with my 35″ fictitious example from the blog post, if she had a 42″ hip circumference, what I would probably do is cast on for the 44″ hip numbers, and then decide on my decreases. As the schematic shows, there are decreases to the waist, and then increases to the bust. Let’s say that I’d cast on with 200 stitches (please note, these are not the actual numbers from the pattern), and the pattern has you work decreases and increases until there are 160 stitches for the bust, so that’s a difference of 40 stitches. I would probably convert this into an A-line tank and just work decreases until I ended up with the 160 stitches for the bust.
2) Alternatively, you could decrease to the size that matches your waist measurement and then increase again to the size that matches your bust, though this technique is going to require some adjustments in the number of rows you work between decreases (as in, you’d probably need to work the decreases more frequently).
3) Another option is to use a larger needle size at the bottom and then gradually decrease to a smaller size as you progress. The trick with this is that to make up the 3″ differential is that you might have to go up to a needle size that doesn’t create a nice fabric, so you’d need to swatch a few different needle sizes to make sure you still like the fabric.
Got any tips and tricks of your for handling this problem? Leave them in the comments!

Great tips, Thank you!!!
Thank you for this great collection of tips around this topic!
I don’t have wide hips, but I have knit projects for people who do. One thing I’ve done is to knit the regular pattern and then split for (or leave open) the side seams at the bottom. This does not work for everyone, but it helps many, and it helps to visually cover some of those extra inches.
You say ” —any reputable knitting or crochet pattern will have a schematic with it”, I’m sorry, but that’s a little harsh when so many beginning or even experienced but amateur designers are offering very nice designs, on Ravelry or their own blogs and websites, but may feel intimidated about having to create a schematic. I hope you comment doesn’t knock the wind out of any self-publisher’s sails.
Schematics don’t have to be terribly involved—I’ve seen schematics in patterns that are hand drawn and very simple but provide the VERY necessary information—and can generally be created by the person tech editing the pattern—which all pattern designers should have done. I recognize that there’s a cost involved in having someone tech edit a pattern and potentially create a schematic but a) it will cut down on the amount of time a designer spends answering questions about potentially problematic patterns, so said designer has more time to create new designs; b) it will help said designer become a better designer by understanding what technical editors are reviewing and provide more in-depth information than is typically generated by test knitters (I’m not knocking test knitters, but they serve a very different function than technical editors); c) knowing that a pattern has been tech edited (many designers at least mention that a pattern has been tech edited, or name the person who did the tech editing, in the pattern notes on Ravelry or on their websites) helps engender consumer faith and goodwill—I’m more likely to spend my $7 on a pattern that I know has been tech edited.
I understand the concern, but I do strongly urge any designer, no matter their skill level, to include a schematic (ask your tech editor if this is a service they can provide) in all of their garment patterns.
I don’t think new designers should be put off at the thought of doing a schematic. It’s actually pretty easy compared to the other components of pattern writing. All you have to do is measure the finished garment or item, and fill in the numbers on a very simple diagram. Then, a quick check against the pattern instructions to make sure the numbers match, e.g. “Knit until work measures 15in from cast on then begin underarm shaping” matches 15in side seam marked on the schematic.
Very helpful! Thanks so much!
VERY happy to see these more personal aspects addressed – THX!