Did you know 2015 is the 10th anniversary of Ultra Alpaca? To celebrate, we’re hosting Berroco’s first Mystery KAL (MKAL)! The first square will be posted on the Ultra Alpaca MKAL blog page and in KnitBits on July 7. Every 2 weeks a new square design will be posted (4 total). You will make 5 squares of each design (20 total squares) culminating with a final blog post on August 31 explaining assembly.
ESTIMATED BERROCO ULTRA ALPACA YARN QUANTITIES (for entire blanket – 20 squares)
#6201 Winter White: 5 hanks (980 yds)
#6278 Stone Washed Mix: 2 hanks (335 yds)
#6243 Navy: 2 hanks (255 yds)
#62169 Twinkle Mix: 2 hanks (230 yds)
#62168 Candy Floss Mix: 1 hank (180 yds)
#62178 Grapefruit Mix: 1 hank (180 yds)
#62179 Melon Mix: 1 hank (175 yds)
#6268 Candied Yam Mix: 1 hank (165 yds)
#62180 Grove Mix: 1 hank (110 yds)
#62176 Pink Berry Mix: 1 hank (105 yds)
#62174 Dungaree Mix: 1 hank (110 yds)
*Please read Alison’s explanation for a better understanding of these estimates.
HOW-TO VIDEO: PICKING UP STITCHES ALONG A GARTER STITCH EDGE
See Amy’s suggestions for alternative color combinations: http://atomic-temporary-1701016.wpcomstaging.com/2015/07/13/amys-thread-ultra-alpaca-mkal-color-inspiration/
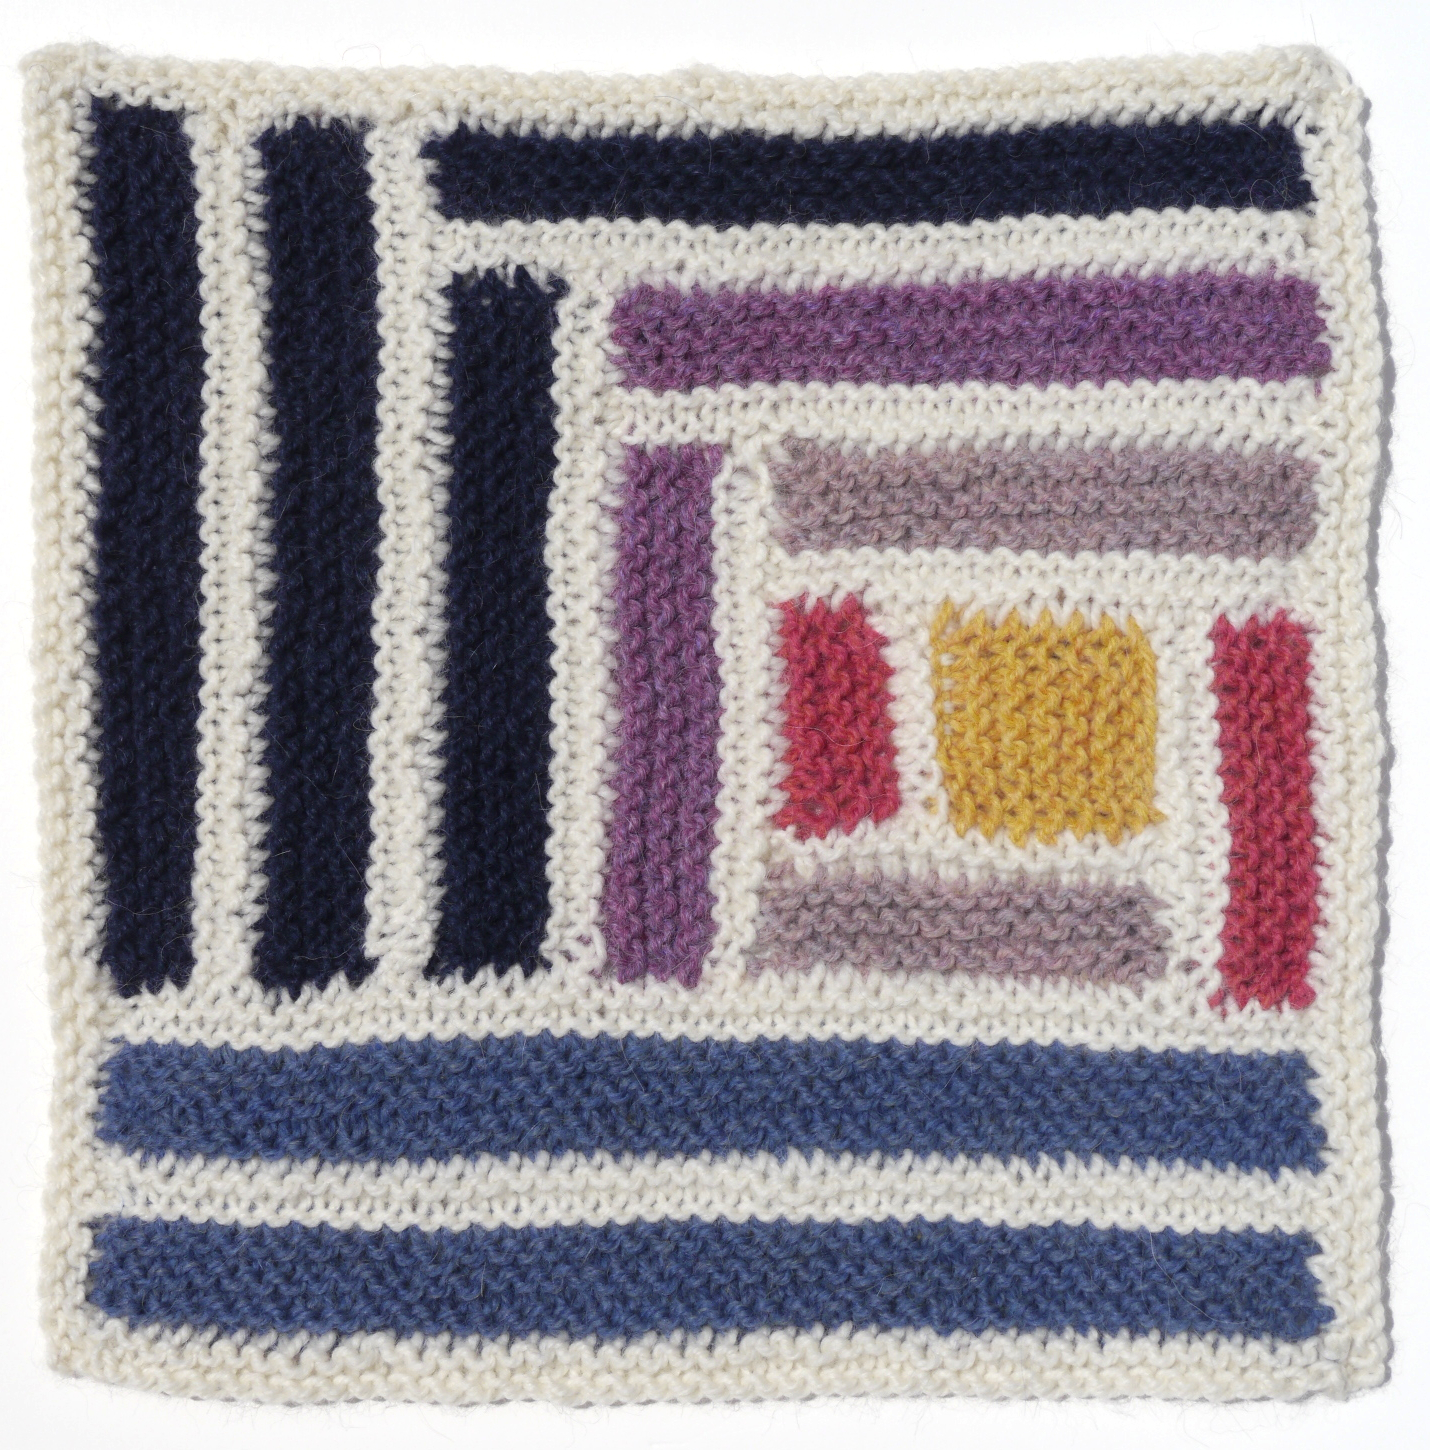
Block 1
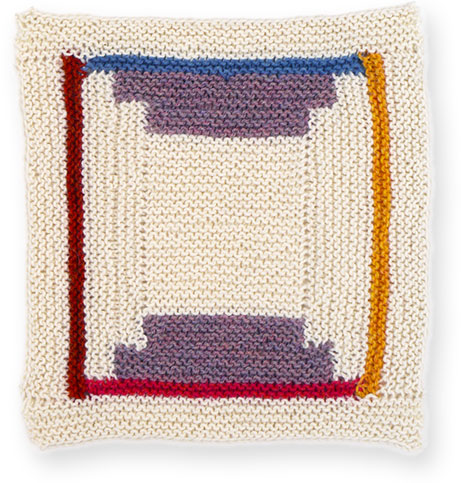
Designed by Emily Nora O’Neil
Skill level: Easy
One size
FINISHED MEASUREMENTS
Approximately 12″ square
MATERIALS
BERROCO ULTRA ALPACA (100 grs), #6201 Winter White (MC), #62168 Candy Floss Mix (CC1), #6278 Stone Washed Mix (CC2), #62178 Grapefruit Mix (CC3), #62179 Melon Mix (CC4) and #6268 Candied Yam Mix (CC5)
(Click here to see breakdown of estimated yardage per color for Block 1.)
Straight knitting needles, size 8 (5.00 mm) OR SIZE TO OBTAIN GAUGE
4 st holders
GAUGE
20 sts and 32 rows = 4″ in Garter St
TO SAVE TIME, TAKE TIME TO CHECK GAUGE
NOTE
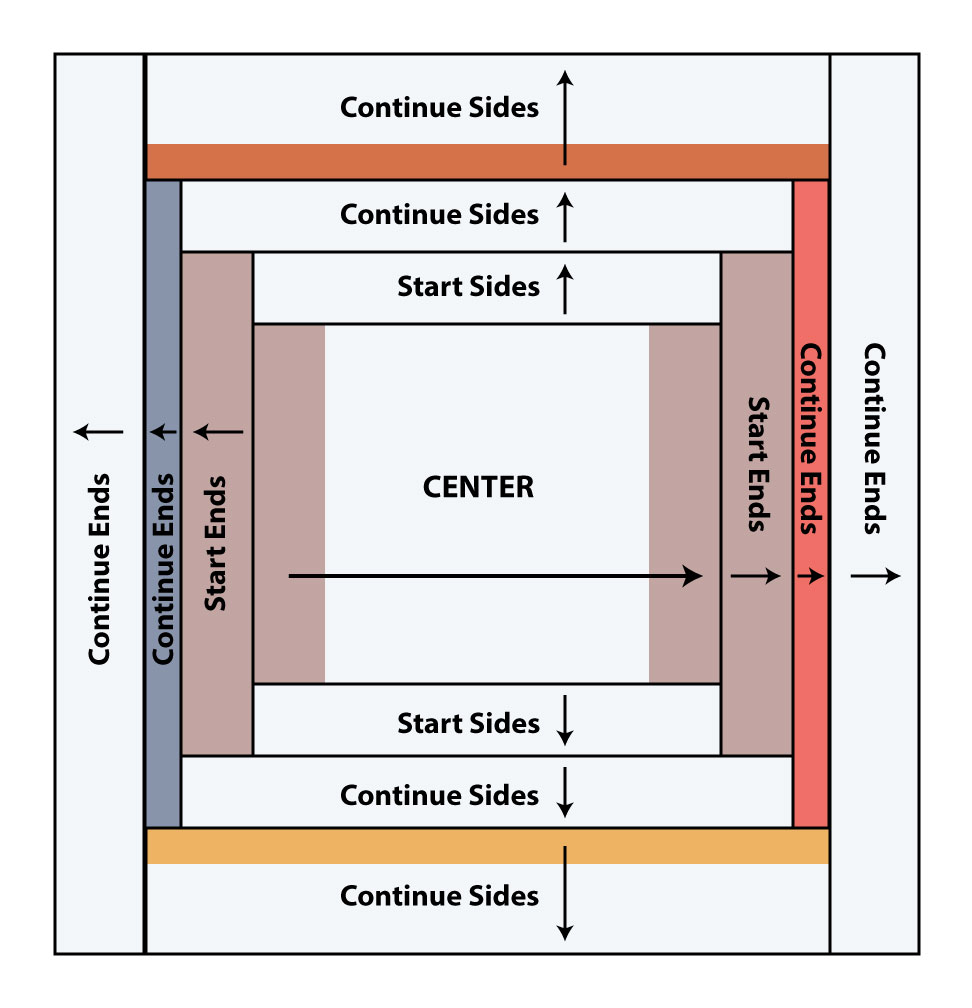
This square is worked all in one piece with no seaming. After completing the center section, you will be working back and forth, first on the side sections, then on the end sections.
SQUARE
Center: With CC1, cast on 20 sts. Knit 8 rows. Change to MC and k44 rows. Change back to CC1 and knit 8 rows, sl sts to a holder.
Start Sides: With RS facing, using MC, working along one side edge of center, pick up and k3 sts over CC1 section, 22 sts over MC section, then 3 sts over second CC1 section – 28 sts. Knit 7 rows. Sl sts to holder. With RS facing, working along second side edge of center, work second side same as first.
Start Ends: With RS facing, using CC1, working along cast-on edge of Center, pick up and k3 sts over MC section, 20 sts over CC1 section, then 3 sts over MC section – 26 sts. Knit 7 rows. Sl sts to holder. With RS facing, using CC1, working across the other end of center, pick up and k3 sts over MC section, k20 sts from holder, then pick up and k3 sts over the other MC section – 26 sts. Knit 7 rows. Sl sts to holder.
Continue Sides: With RS facing, using MC, working along side edge of center, pick up and k4 sts over CC1 section, k28 sts from holder, then pick up and k4 sts over second CC1 section – 36 sts. Knit 7 rows. Sl sts to holder. With RS facing, work second side same as first.
Continue Ends: With RS facing, using CC2 and working along cast-on edge of center, pick up and k4 sts over MC section, k26 sts from holder, then pick up and k4 sts over second MC section – 34 sts. Knit 3 rows. Sl sts to holder. With RS facing, using CC3 and working along the other end of center, work same as first end.
Continue Sides: With RS facing, using CC4 and working along one side edge of center, pick up and k2 sts over CC2 section, k36 sts from holder, then pick up and k2 sts over CC3 section – 40 sts. Knit 3 rows. Change to MC and k10 rows. Bind off. With RS facing, using CC5 and working along the other side edge of center, pick up and k2 sts over CC3 section, k36 sts from holder, then pick up and k2 sts over CC2 section. Knit 3 rows. Change to MC and k10 rows. Bind off. Sides are now completed.
Continue Ends: With RS facing, using MC, working along cast-on edge of center, pick up and k5 sts over MC section, 2 sts over CC4 section, k34 sts from holder, pick up and k2 sts over CC5 section, then 5 sts over MC section – 48 sts. Knit 9 rows. Bind off. With RS facing, using MC and working along the other end of center, pick up and k5 sts over MC section, 2 sts over CC5 section, k34 sts from holder, pick up and k2 sts over CC4 section, then 5 sts over MC section – 48 sts. Knit 9 rows. Bind off. Square is now completed.
FINISHING
Weave in all ends and block as desired.
Designed by Amy Christoffers
Skill level: Easy
One size
FINISHED MEASUREMENTS
Approximately 12′′ square
MATERIALS
1 hank each BERROCO ULTRA ALPACA (100 grs), #6268 Candied Yam
Mix (A), #62178 Grapefruit Mix (B), #62180 Grove Mix (C), #6201 Winter White (D), #62168 Candy Floss Mix (E), #62179 Melon Mix (F) and #6278 Stone Washed Mix (G)
Straight knitting needles, size 8 (5.00 mm) OR SIZE TO OBTAIN GAUGE
GAUGE
20 sts and 32 rows = 4′′ in Garter St
TO SAVE TIME, TAKE TIME TO CHECK GAUGE
NOTE
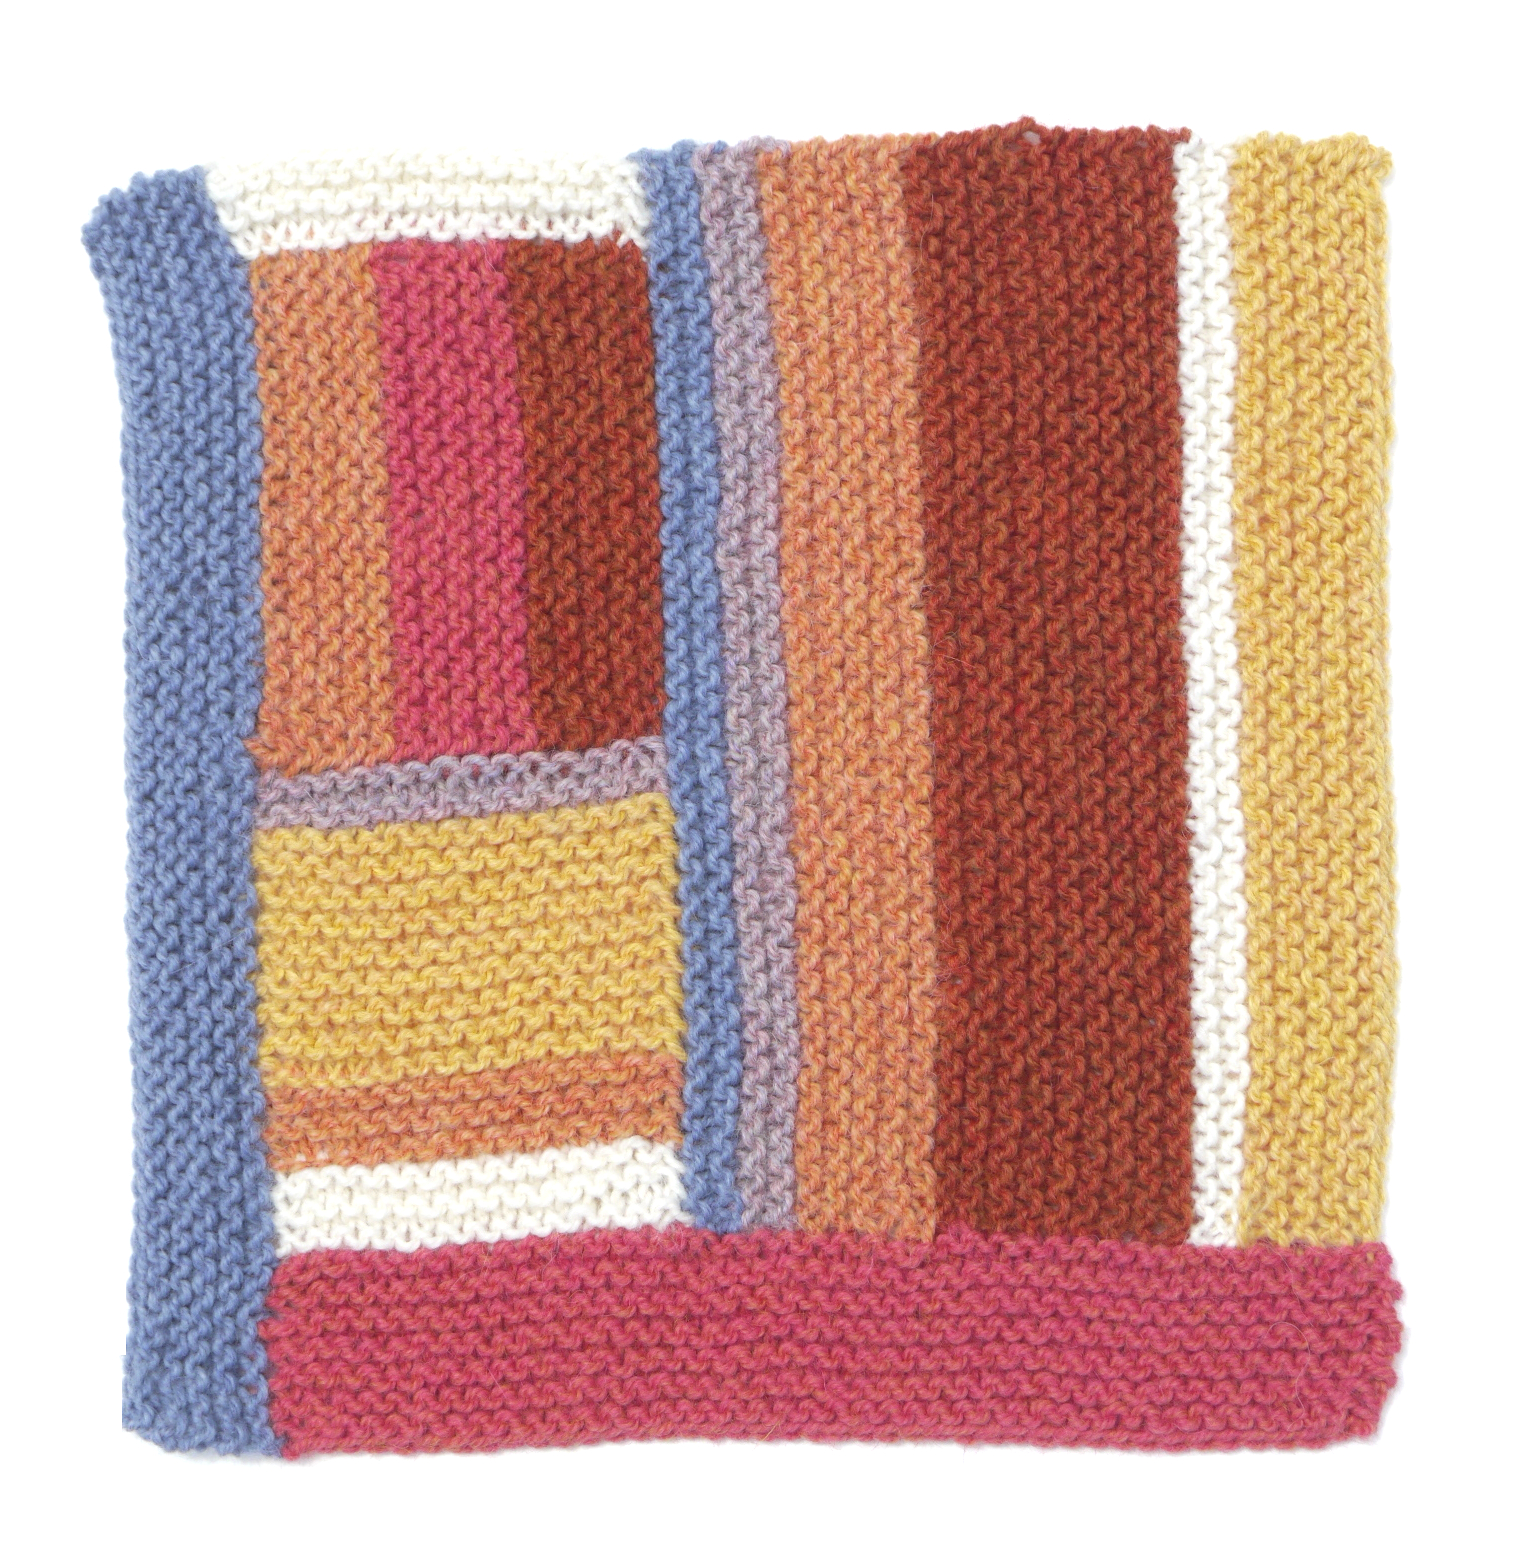
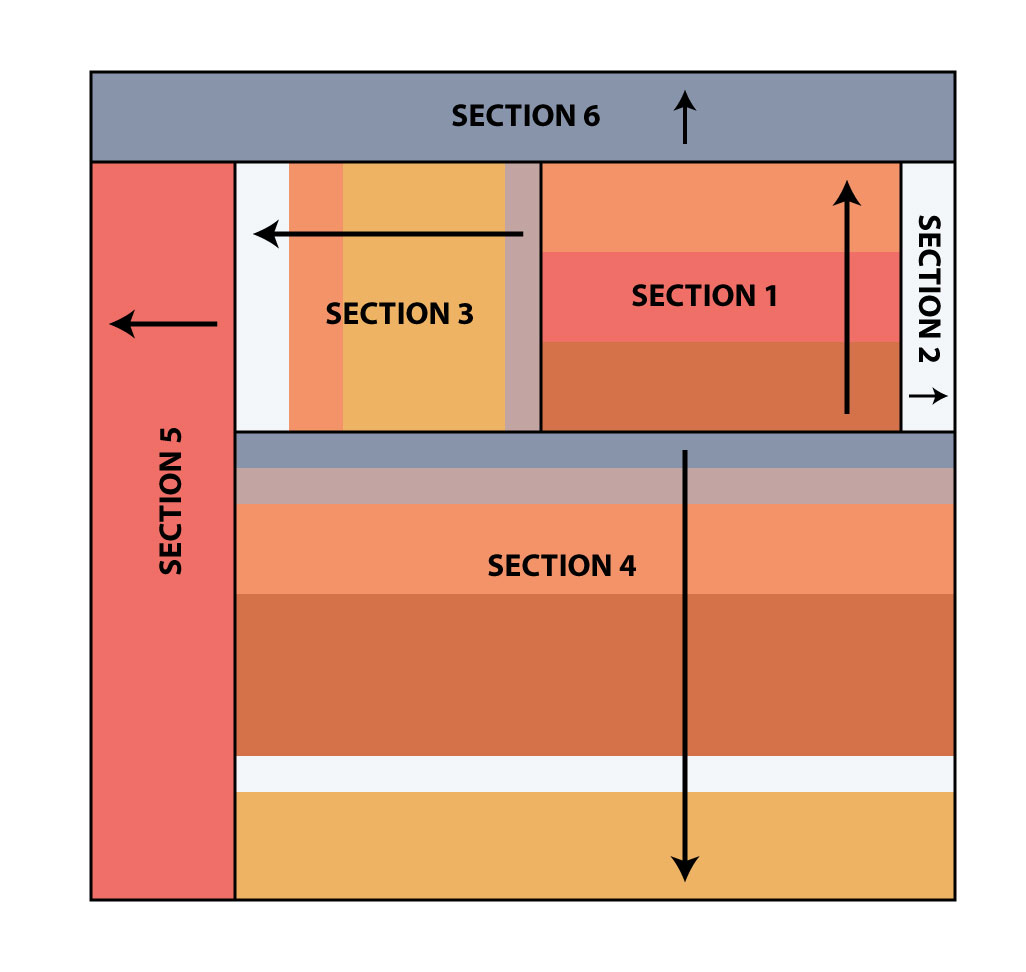
This square is made in one piece with no seaming and is worked all in Garter St. After working Section 1, you will be turning work and picking up sts on all sides for the remaining sections.
SQUARE
Section 1:
With A, cast on 20 sts. Knit 9 rows (5 ridges). Change to B and knit 10 rows. Change to C and knit 10 rows. Bind off and mark bind-off as RS of work.
Section 2:
Turn work 90 degrees to the left. With RS facing, using D, pick up and
k17 sts along right side edge of Section 1. Knit 5 rows (3 ridges), then bind off on RS.
Section 3:
Turn work 180 degrees. With RS facing, using E, pick up and k17 sts along left side edge of Section 1. Knit 3 rows. Change to F and knit 18 rows. Change to C and knit 6 rows. Change to D and knit 6 rows. Bind off on RS.
Section 4:
Turn work 90 degrees to the right. With RS facing, using G, pick up and k42 sts along side edge of Section 3, cast-on edge of Section 1, and side edge of Section 2. Knit 3 rows. Change to E and knit 4 rows. Change to C and knit 10 rows. Change to A and knit 18 rows. Change to D and knit 4 rows. Change to F and knit 10 rows. Bind off on RS.
Section 5:
Turn work 90 degrees to the right. With RS facing, using B, pick up and k42 sts along bound-off edge of Section 3 and side edge of Section 4. Knit 13 rows. Bind off on RS.
Section 6:
Turn work 90 degrees to the left. With RS facing, using G, pick up and k50 sts along side edge of Section 2, bound-off edge of Section 1, side edge of Section 3 and side edge of Section 5. Knit 9 rows. Bind off on RS.
FINISHING
Weave in all ends and block as desired.
Block 3
Designed by Ashley Palumbo
Skill level: Easy
One size
FINISHED MEASUREMENTS
Approximately 12″ square
MATERIALS
1 hank each BERROCO ULTRA ALPACA (100 grs), #62179 Melon Mix (A), #6201 Winter White (B), #62178 Grapefruit Mix (C), #62168 Candy Floss Mix (D), #62176 Pink Berry Mix (E), #6243 Navy (F) and #62169 Twinkle Toes (G)
Straight knitting needles, size 8 (5.00 mm) OR SIZE TO OBTAIN GAUGE
GAUGE
20 sts and 32 rows = 4″ in Garter St
TO SAVE TIME, TAKE TIME TO CHECK GAUGE
NOTE
This square is made in one piece with no seaming and is worked all in Garter St. After working Section 1, you will be turning work and picking up sts on all sides for the remaining sections.
SQUARE
Section 1: With A, cast on 8 sts. Knit 14 rows, change to B and knit 2 rows. Change to C and knit 6 rows, end on WS. Bind off.
Section 2: Turn piece 90 degrees to the right. With RS facing, using B, pick up and k4 sts along C rows, 2 sts along B rows, then 7 sts along A rows – 13 sts. Knit 1 row. Change to D and knit 6 rows, end on WS. Bind off.
Section 3: Turn piece 90 degrees to the right again. With RS facing, using B, pick up and k4 sts along D rows, 1 st along B rows, then 9 sts along A rows – 14 sts. Knit 3 rows. Change to C and knit 6 rows, end on WS. Bind off.
Section 4: Turn piece 90 degrees to the right again. With RS facing, using B, pick up and k3 sts along C rows, 2 sts along B rows, 9 sts along A rows, 2 sts along B rows, then 3 sts along C rows – 19 sts. Knit 3 rows. Change to D and knit 6 rows, end on WS. Bind off.
Section 5: Turn piece 90 degrees to the right again. With RS facing, using B, pick up and k4 sts along D rows, 2 sts along B rows, 8 sts along C rows, 2 sts along B rows, then 4 sts along D rows – 20 sts. Knit 3 rows. Change to E and knit 6 rows, end on WS. Bind off.
Section 6: Turn piece 90 degrees to the left. With RS facing, using B, pick up and k21 sts along D rows, 2 sts along B rows, then 4 sts along E rows – 27 sts. Knit 3 rows. Change to E and knit 6 rows, end on WS. Bind off.
Section 7: Turn piece 90 degrees to the right. With RS facing, using B, pick up and k4 sts along E rows, 2 sts along B rows, then 20 sts along E rows – 26 sts. Knit 3 rows. Change to F and knit 6 rows, end on WS. Bind off.
Section 8: Turn piece 90 degrees to the left. With RS facing, using B, pick up and k26 sts along E rows, 2 sts along B rows, then 4 sts along F rows – 32 sts. Knit 3 rows. Change to F and knit 6 rows, end on WS. Bind off.
Section 9: Turn piece 90 degree to the right. With RS facing, using B, pick up and k4 sts along F rows, 2 sts along B rows, then 26 sts along F rows – 32 sts. Knit 3 rows. Change to F and knit 6 rows, end on WS. Bind off.
Section 10: With RS facing, using B, pick up and k32 sts along bound-off edge of Section 9. Knit 3 rows. Change to F and knit 6 rows, end on WS. Bind off.
Section 11: Turn piece 90 degrees to the right. With RS facing, using B, pick up and k4 sts along F rows, 2 sts along B rows, 4 sts along F rows, 2 sts along B rows, 4 sts along F rows, 2 sts along B rows, 4 sts along E rows, 2 sts along B rows, 15 sts along D rows, 2 sts along B rows, then 4 sts along C rows – 45 sts. Knit 3 rows. Change to G and knit 6 rows, end on WS.
Section 12: With RS facing, using B, pick up and k45 sts along bound-off edge of Section 11. Knit 3 rows. Change to G and knit 6 rows, end on WS. Bind off.
Edging: First Side: With RS facing, using B, pick up and k45 sts along bound-off edge of Section 12. Knit 3 rows, end on WS. Bind off.
Second Side: Turn piece 90 degrees to the right. With RS facing, using B, pick up and k 2 sts along end of first side, 4 sts along F rows, 2 sts along B rows, 4 sts along F rows, 2 sts along B rows, 15 sts along C sts, 2 sts along B rows, 4 sts along D rows, 2 sts along B rows, 4 sts along E rows, 2 sts along B rows, then 4 sts along F rows – 47 sts. Knit 3 rows, end on WS. Bind off.
Third Side: Turn piece 90 degrees to the right. With RS facing, using B, pick up and k2 sts along end of second side, 33 sts along F sts, 2 sts along B rows, 4 sts along F rows, 2 sts along B rows, then 4 sts along F rows – 47 sts. Knit 3 rows, end on WS. Bind off.
Fourth Side: Turn piece 90 degrees to the right. With RS facing, using B, pick up and k2 sts along end of third side, 33 sts along F sts, 2 sts along B rows, 4 sts along G rows, 2 sts along B rows, 4 sts along G rows, then 2 sts along beg of first side – 49 sts. Knit 3 rows. Bind off.
FINISHING
Weave in all ends and block as desired.

Block 4
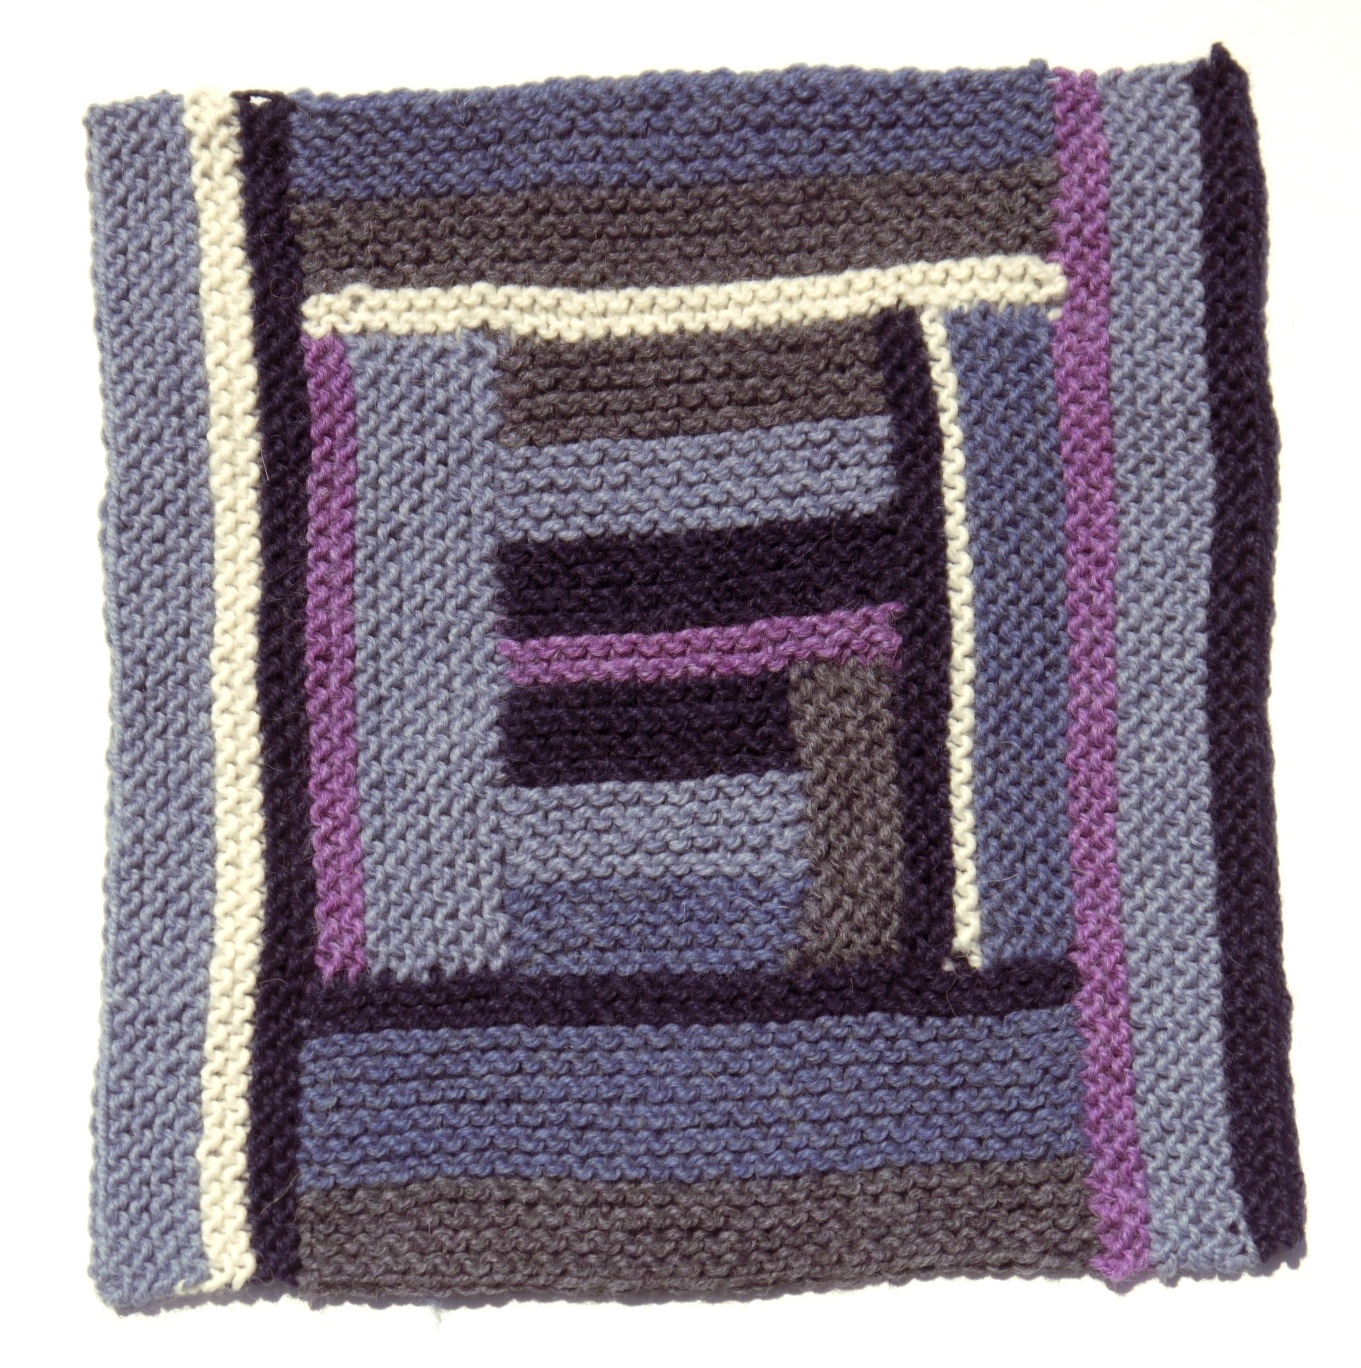
Designed by Alison Green
Skill level: Easy
One size
FINISHED MEASUREMENTS
Approximately 12″ square
MATERIALS
1 hank each BERROCO ULTRA ALPACA (100 grs), #6243 Navy (A), #6278 Stone Washed Mix (B), #62169 Twinkle Mix (C), #62174 Dungaree Mix (D), #62176 Pink Berry Mix (E) and #6201 Winter White (F)
Straight knitting needles, size 8 (5.00 mm) OR SIZE TO OBTAIN GAUGE
GAUGE
20 sts and 32 rows = 4″ in Garter St
TO SAVE TIME, TAKE TIME TO CHECK GAUGE
NOTE
This square is made in one piece with no seaming and is worked all in Garter St. After working Section 1, you will be turning work and picking up sts on all sides for the remaining sections.
SQUARE
Section 1: With A, cast on 12 sts. Knit 7 rows (4 ridges). Change to B and knit 8 rows. Change to C and knit 8 rows. Bind off and mark bind-off as RS of work.
Section 2: Turn work 90 degrees to the right. With RS facing, using D, pick up and knit 12 sts along left side edge of Section 1. Knit 7 rows (4 ridges), then bind off on RS.
Section 3: Turn work 90 degrees to the right. With RS facing, using E, pick up and k16 sts along side edge 2 and cast on of Section 1. Knit 3 rows (2 ridges). Change to A and knit 8 rows. Change to B and knit 8 rows. Change to D and knit 8 rows. Bind off on RS.
Section 4: Turn work 90 degrees to the right. With RS facing, using B, pick up and k26 sts along side edges of Sections 3 and 1. Knit 11 rows (6 ridges). Change to E and knit 4 rows. Bind off on RS.
Section 5: Turn work 180 degrees. With RS facing, using A, pick up and k26 sts along bound-off edge of Section 2 and side edge of Section 3. Knit 3 rows. Change to F and knit 2 rows. Change to C and knit 8 rows. Bind off on RS.
Section 6: Turn work 90 degrees to the right. With RS facing, using F, pick up and k31 sts along side edge of Section 5, bound-off edge of Section 3 and side edge of Section 4. Knit 3 rows. Change to D and knit 8 rows. Change to C and knit 8 rows. Bind off on RS.
Section 7: Turn work 180 degrees. With RS facing, using A, pick up and k31 sts along side edge of Section 4, bound-off edge of Section 1, side edge of Section 2 and side edge of Section 5. Knit 3 rows. Change to C and knit 12 rows. Change to D and knit 8 rows. Bind off on RS.
Section 8: Turn work 90 degrees to the right. With RS facing, using E, pick up and k48 sts along side edge of Section 7, bound-off edge of Section 5 and side edge of Section 6. Knit 3 rows. Change to B and knit 8 rows. Change to A and knit 4 rows. Bind off on RS.
Section 9: Turn work 180 degrees. With RS facing, using A, pick up and k48 sts along side edge of Section 6, bound-off edge of Section 4 and side edge of Section 6. Knit 3 rows. Change to F and knit 4 rows. Change to B and knit 10 rows. Bind off on RS.
FINISHING
Weave in all ends and block as desired.

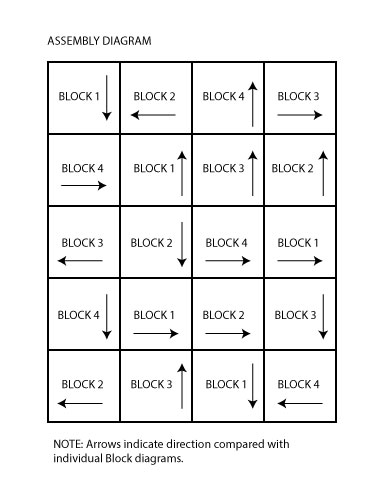
Blanket
FINISHING
Weave in all ends and block squares as desired. Use diagram as a guide to block placement, or choose your own configuration. With #6201 and crochet hook, join blocks into strips as follows:
Align two blocks, with RS facing out. * Insert hook into edge of left block, then into edge of right block, and pull up a loop. Yo hook and pull through loop. Rep from *.
Join the strips using the same method, then work 1 row of sc around entire blanket. Weave in any remaining ends.
Looking for an alternative layout? Amy shared some different options in her latest blog post!

Will we be using these skeins/colors again in subsequent blocks, or will each block have separate requirements that will cause us to buy excess amounts of yarn? Can you give the total yarn list “up front”? Or at least the repeated colors, like background, etc. thanks much.
We will be adding a basic supply list (to make the blanket as is) and Alison is working on a blog post to explain how you can calculate for variations. It should be ready tomorrow at the latest. You don’t use all the same colors in each square, but many of the colors are repeated throughout.
I would like to know the approximate overall cost of this project assuming the cost of one ball of yarn is about $10-12.
As a wholesale company, we don’t set the final retail price for our yarns. We’ll be adding a general supply list tomorrow (at the latest) so that you’ll be able to take it to your LYS or online retailer and determine the cost.
Wondering if we will be using the leftovers from these six skeins to do the other three squares. If not, this will be cost will prohibit me from participating. I really want to do this one so I await your reply! Thank You
Sorry to hear that, Pat. You will be making 5 of each square design so you will need more yarn. We’ll be adding a general supply list tomorrow.
How many of these do you make? Also is there a supply list?
If you plan to make it to match our sample, you will make 5 of each block (so 20 total blocks). We will be adding a basic supply list (to make the blanket as is) and Alison is working on a blog post to explain how you can calculate for variations. It should be ready tomorrow at the latest.
Sounds like fun!
How many of block 1 are needed?
If you plan to make it to match our sample, you will make 5 of each block (so 20 total blocks).
How many of each
square are needed for the blanket?
If you plan to make it to match our sample, you will make 5 of each block (so 20 total blocks).
Is it possible to download the pattern as a pdf (or other format)?
We will be releasing the entire pattern as a PDF at the end of the MKAL. Until then, the instructions for each square will only be available on this blog page. However, you should be able to export the page as PDF file from your browser, if you would prefer to use that format.
I love quilts, but i cannot sew. This knitter is very happy 🙂
Thank You!
For the supply list for square one, will I have enough to make a total 5 blocks for square one?
Hi Libby,
We’ve added the estimated total yarn quantities for the entire blanket at the top of this page. If you would like to see the breakdown of yardage per color per block, check out Alison’s blog post: https://blog.berroco.com/2015/07/07/ultra-alpaca-mkal-yarn-quantities/.
As a crocheter who knits, I look forward to making these squares. The knitting guild I belong to had a 2 day workshop with Myra Wood and we learned how to make log cabin, along with some free form blocks. I wonder, if the yarn costs too much, can I use other yarn but try to match the colors?
Our Comfort and Vintage yarns work up at a similar gauge and have a lower price point. Vintage, in particular, has some close colors to our Ultra Alpaca line.
I love the idea of no seaming 🙂 I will wait until tomorrow to decide if I can afford to make this in Alpaca or use from my stash! Thank you for sharing the pattern.
I am in, so 5 of each block.
Yes, 4 designs, 5 of each, 20 total blocks.
For those who are stating it is cost prohibitive, their LYS should be capable of finding a yarn with the same qualities (abet not Alpaca) which will allow them to make the project using another yarn. I know this is not what a yarn company wants to hear, but sometimes an inexpensive substitute is necessary for those who are on a strict budget, like single moms, college students, unemployed knitters. We too would love to knit along, but can not afford the luxury yarns.
Any other color suggestions? I would love to make a neutral color blanket (browns, tans, blacks, etc) thank you!
You can look at our full color line for Ultra Alpaca on the website: http://www.berroco.com/yarns/berroco-ultra-alpaca. Amy will also be mentioning color alternatives when she shares her block.
Can we use any color besides the original yarn as said to use in pattern?
Yes, you can choose whatever colors you want.
I’m allergic to wool so will be using acrylic yarn from my stash
Wool is actually hypoallergenic, and it is usually the Lanolin or the scouring agent used to treat the raw wool or the chemical in the non natural dye used to make the vibrant colors.
And if you just get itchy, it is probably a short shear. This is when the individual who was shearing the sheep (and this process does not hurt them) does not do one full cut but many short ones. This causes short fibers to poke out of the spun wool and that is what makes us uncomfortable. The heat coupled with the short pokey ends will cause a rash which many confuse with an allergic reaction (I know, I thought this for years, but when finally tested by a specialist he explained the issue and the test proved it was the scouring agent of some of the cheaper wool. I now have the most beautiful shawl in a cobweb lace out of wool. Thank goodness for a very smart allergist!
Thanks for your explanation, Noel. We try to help customers understand this, but it is hard to hear if you’re sure you have an allergy. (And of course, people really do. Probably just not nearly as many people as think they do.) I hope it’s okay that I printed out your explanation and put it in our “helpful hints” binder in the shop.
We sell the wonderful Comfort and Vintage yarns, too, because there are reasons besides allergies to use blends. The solution isn’t always the fiber. It’s the QUALITY of the fiber.
It seems that some colors do not appear available on the website
I just double checked, they are all there: http://www.berroco.com/yarns/berroco-ultra-alpaca.
What cast on did you use? I want both sides to look the same. I tried a provisional cast on, but when i took out the crocheted chain I was short one stitch! Any idea what I did wrong?
You can delete this…I figured it out.
Hi Sarah, Emily used a long tail cast on for her block, but you can use whatever you’re most comfortable with. If you’re having trouble with the provisional cast on, you can contact patternsupport@berroco.com for help.
Did Emily count the long tail cast on as the first row? Also, the stitches ( loops) that are on my needle are they considered one row? I did start making one block but found that I was not even when starting to do the sides the only thing I could figure was my row count was off. Starting over. Any help on this?
Hi Hallie! I typically don’t consider my long tail cast on as my first row. If you want to I think that is fine, just keep that rule consistent throughout the project. Yes, after the cast on, the stitches on your needle are considered a row. Something that may help when counting your garter stitch (the stitch pattern used in the MKAL) rows is to count the ridges that form. For each ridge you have knitted two rows. So if the pattern calls for 8 rows you should be able to could 4 ridges on your piece. I hope this helps!
when we change to CC2 it says to pick up 4 + 26 + 4 = 36, but it actually equals 34 stitches; so do we work 34 stitches on the end?
It looks like that was an error, and I apologize for not seeing this myself sooner! I have fixed the stitch count in the first “Continue Ends” section, as well as the last “Continue Ends” section. Thank you for bringing this to our attention and I’m sorry for the inconvenience!
I believe the total stitch count at the continued end section should be 34 stitches, not 36. This probably changes things through to the end.
You’re right – I have made the necessary corrections in both “Continue Ends” sections. Thanks and I apologize for the error!
thanx so much for clearing that up; I had thought I’d finish the block Thu nite but when I ran into that question I didn’t want to proceed in case I was somehow supposed to get 36 & would then have to rip everything out =( – so now I’ll finish Sat nite instead – Mahalo =)
Have the directions for Block 2 been released yet?
No, they come out every two weeks. Block 2 will be available next Tuesday, July 21.
I am concerned with using Ultra Alpaca for an afghan because it is hand wash, dry flat. That’s difficult when you have a 60″ x 48″ afghan, which looks like the size this will be when finished. Can you machine wash on delicate in cold water and dry on low in the dryer? A friend told me alpaca felts very easily.
Hi Diana, I personally wouldn’t, but if you plan to try that, you should test it out with a swatch, first. You could also swap the Ultra Alpaca for one of our machine washable yarns like Comfort (also drier-friendly) or Vintage, for easier care.
Was wondering how to weave in the ends on this so as not to show too badly since it’s a blanket and both sides are seen?
Hi Hallie, we all weave in our ends in slightly different ways. I bound off and cast on for each of my sections so I had a nice lines of stitches on the back to weave into. Emily tends to use a duplicate stitch style of weaving. Here’s a link to a video she made demonstrating that kind of weaving: http://www.berroco.com/learning-center/how-videos/how-weave-ends-folio. Hope this helps!
on block 2 in section 3 it says to use E, F, C, D; but it looks like you used E, F, A, D; section 4 says G, E, C, A, D, F; it looks like G, E, A, C, D, F ???
I just double-checked it against the block and it is correct as written. It looks like you are thinking that Grove Mix (C) and Candied Yam Mix (A) are reversed in these sections, but they are in the right places. However, I’m thinking that diagrams of the sections would be useful. I should be able to make that happen, although it might take me a couple days.
Where you cast on Section 1 with A ends up being up against the beginning of Section 4 – hopefully that info will help orient you with the different sections while I’m working on a diagram.
yeah I figured out that after you did the first section you turned it upside down – I didn’t =( so your A is my C & your C is my A – I had already done sections 1, 2, & 3 when I discovered my mistake so not going to rip it out; will just follow the colors & ignore the ABCs – I expect it’ll be OK either way
Just finished block 1 over the weekend, just in time for block 2.
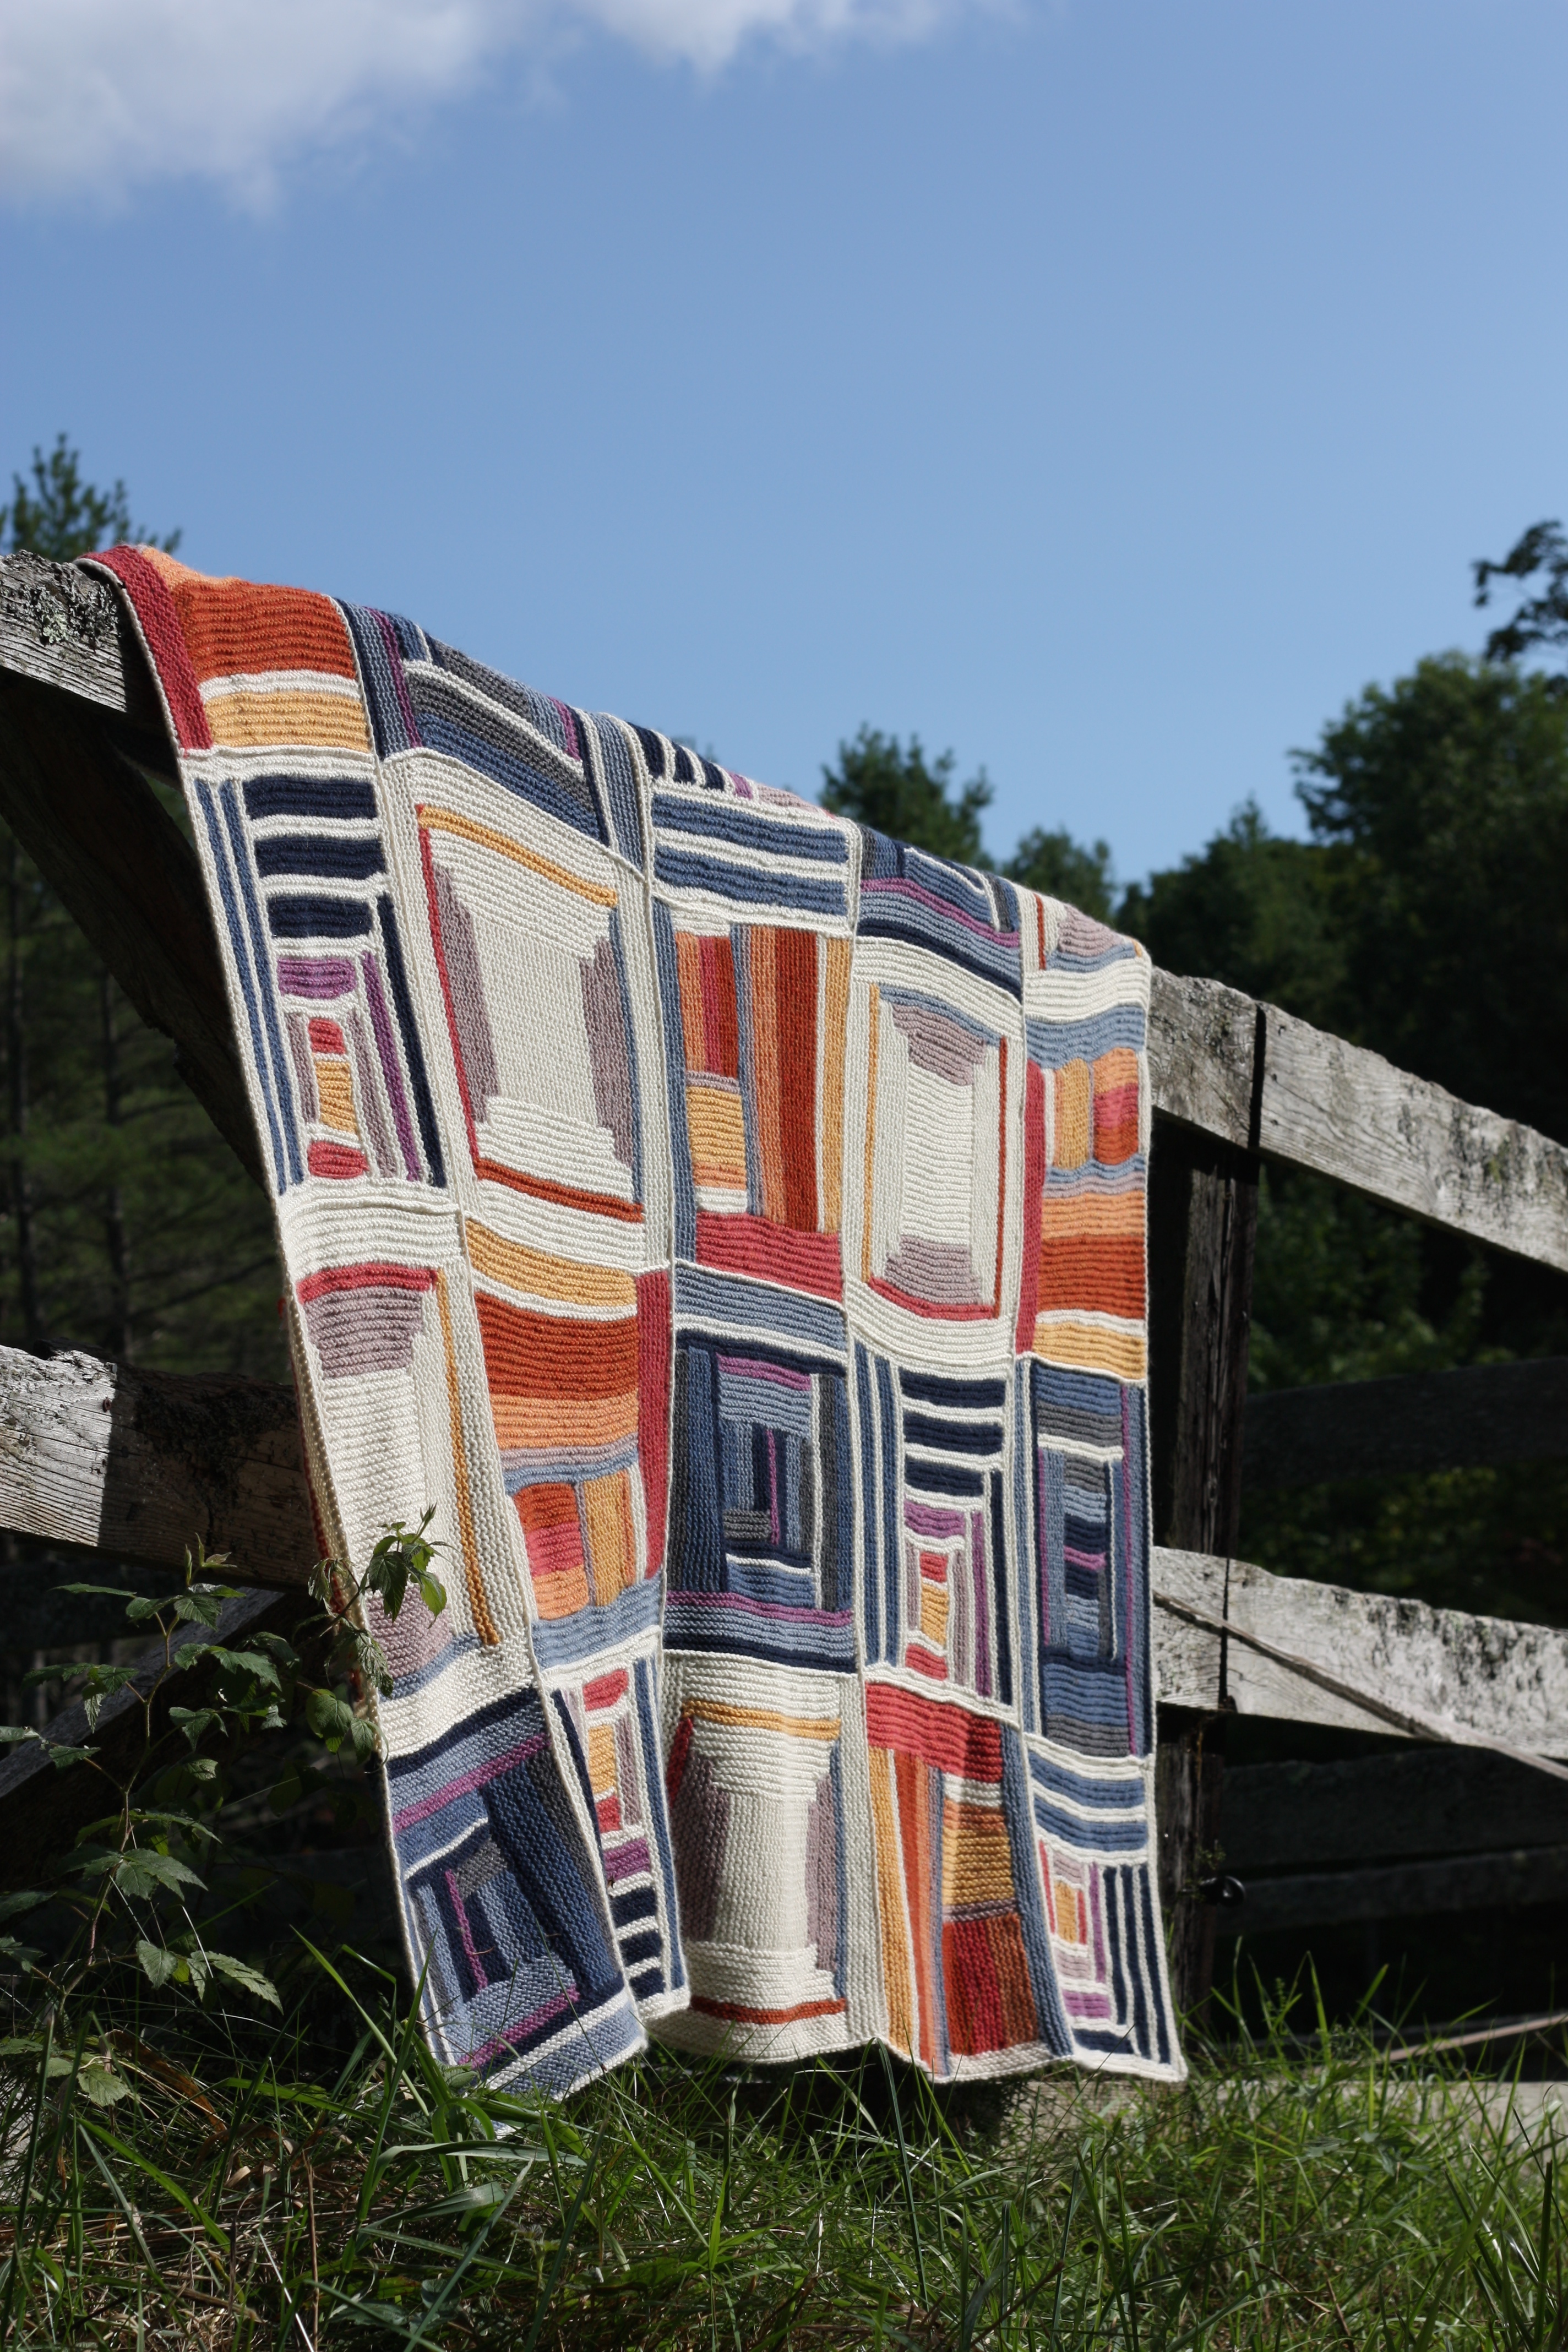
Is there a picture of the final blanket?
There will be at the end. We aren’t showing it now because it’s a mystery knit-along.
My local store didn’t have all the yarn, especially the winter white, so I had to order. Can’t wait to get my shipment and start block one!
I finally got my yarn and have started working on the first block. Hope to catch up soon. The yarn I got for CC1 is numbered 62168, as in the pattern, but it doesn’t look like the same color. Is “Candy Floss Mix” supposed to look purpleish as in the picture? The yarn I have is more of a pinkish gray. I like what’s in the picture.
That is the correct color. The yarn is a pinkish gray shade. Sorry for any confusion!
Loved the comment posted about the wool and shear, cut, fibers poke ect. Very interesting.
Thanks for the final instructions for Block 4. I am so excited to see the arrangement for the mystery blanket.
Glad to get Block 4. Interesting color combo! I’m also intrigued to see how the blocks will be put together.
How do I copy this please?
Hi Brendah,
All the instructions you need are on this page.
OK, so when do we get to see how you’re putting it together?
Hi Lee,
We’ll be sharing the finished blanket and alternative arrangements in two weeks!
Hi, I have finished one block of Block 1. I do not consider myself a beginner knitter, but I am not used to picking up stitches. I was initially confused on how to pick up stitches and then pick up stitches from the stitch holder. I didn’t have a clear idea of “pick up and knit”. I picked the stitches based on the video, but initially thought I had to just slide the stiches off the holder and then pick up more stiches. This meant I was breaking the yarn to get to the other end. Then I didn’t know which end to knit from. What I mess and very frustrating! I started all over after I realized that I should knit the stiches from the holder. Everything then worked out great. I am not sure this would be clear to a beginner! Maybe some extra guidance is needed?
Now that I am breezing along…I love the pattern and the yarn. Thank you for the pattern!!!
Sorry you had trouble, Jean! You can always email patternsupport@berroco.com if you’re unsure about something. Glad to hear you figured it out.
I’m enjoying the MKAL, however I’m concerned about my block three squares being smaller–even after blocking. I’m thinking about taking off the edges and adding another garter ridge. Is anybody else having similar trouble?
Hi Sarah,
If you’re getting gauge and still concerned about the size difference, you can definitely add extra rows to the white border.
My knitting mentor encouraged me to not add extra rows…and so far, it’s coming together nicely. It’s so fun!
I wasn’t sure I liked the darkness of the fourth square, but now that I see your completed blanket, it goes very well with the other squares. Thanks for a great pattern.