I recently had a conversation with a fellow knitter about stitch markers. There had been a little confusion about removable versus non-removable stitch markers, and I realized that maybe some other folks would benefit from a little discussion about the types of markers and all the wonderful ways you can use them.
 First up, there’s the non-removable kind. These can be a wide variety of objects, from spare bits of yarn that you knot at one end to circular or triangular bits of plastic. You could use metal washers that you find at home improvement shops. There are tons and tons of handmade options available from sites such as Etsy. Your local yarn store probably has a good selection, as well! (You can use our Store Locator to find a yarn store near you that carries Berroco yarns and probably has a range of stitch markers.)
These stitch markers have to be placed on the needles as you’re working. Many patterns indicate when to use them with the instructions “place marker.” On the following rows, when you come to the marker, you slip the marker from one needle to the other to maintain the marker’s position.
I love to use these kinds of stitch markers in many different ways. Many patterns have you place stitch markers when you are working a series of increases or decreases, so you know at which point you’ll need to work the stitches to make them line up nicely. I use them to cast-on large numbers of stitches to ensure that I end up with the correct number (or close enough). I also use stitch markers to separate out pattern repeats, so that I know pretty quickly when I get slightly off track. I wrote about using markers to indicate the lace pattern repeats of our Odora shawl, but you can also use stitch markers to differentiate between the cable repeats of this week’s free pattern, Emilia.

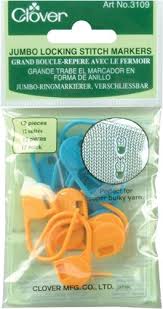 Then you have removable markers, or locking markers. These markers have an opening that “locks” into place. There are, again, a wide variety of these types of markers, or you could use safety pins (coiless safety pins are the preferred option, as those little coils can get caught in the yarn). These markers work well for both knitting and crochet.
These stitch markers can be placed on the needles as you’re working, but they can also be placed after the fact. They also can be placed in stitches themselves. Typically when you see an instruction to place a removable marker (as opposed to just “place marker”), the patterns are letting you know that you’re going to need to remove this at a later time. Also pay attention to what the pattern is telling you—in Davit, for example, there’s an instruction to “Mark first and last sts…with removable markers.” Since the pattern is saying to mark the stitches, you’ll want to place the removable markers on the stitches themselves, not on the needles.
This type of stitch marker also has a variety of uses! I tend to use them as both regular and removable stitch markers, but in that instance, it’s very helpful to have different colors of markers if a pattern calls for both removable and non-removable markers. I just started a new crochet project and I placed a removable marker in every 20 loops as I was starting to help me count the stitches. And you can place them in stitches as you are working crochet to help you easily find the start of a new round. They’re great to use when you’re picking up stitches and want to make sure you do so evenly. And if you need to keep track of your work vertically, as in how many rows you’ve worked, they’re great for that too!

Do you have any other tips and tricks for using stitch markers? Let us know in the comments!

I also use them for counting rows, especially row repeats (ex: repeat 3 rows…). The removable ones can be hung off the side or you can use them like tokens.
just a caution to not run a lifeline through the non-removable markers! I have Addi interchangeable needles with a lifeline slit in the cable. This allows me to place the lifeline in a row of knitting automatically as i knit but also runs the lifeline through the markers at the same time. I didn’t realize the issue until the next row!
I use little orthodontic rubber bands to keep track of rows, they can be knit right into a new stitch and snipped out when no longer needed. They are easy on the fingers when used as regular stitch markers and do not snag the yarn itself.
I use the locking ones in the latest crochet stitch when I need to put down my project. This keeps it from uncrocheting!
I like to place a removable marker in the first stitch of a row when I start to work on a large project, for the day. It is a motivational push to keep knitting “just one more row” so I have a specific set of inches completed for that day.
Best Idea I’ve seen is using the removable markers on buttonhole rows to mark the placement for the buttons. Just place the removable marker on the same row opposite the buttonhole, and you’ll know exactly where to sew them at the end of the project.
I use removable stitch markers when I am doing short rows. I’ve found that if I mark the wrapped stitch it helps me identify it that much easier when it’s time to pick it up again!
I use the removable markers when I spot a dropped stitch. I clip onto the stitch and then when I have knitted back to it, correct my error. This keeps it loose work from running down further.
I use an electric toothbrush and each brush head comes with some lovely little plastic rings to use on the toothbrushes to differentiate different family members brush heads. I don’t need to do that, but I save the colored plastic rings for stitch markers. You can never have enough. I’m always dropping them down the couch or in the car. They fit most needle sizes upto about a 10.5.
I use stitch markers a lot, particularly if I’m knitting something with a fair number of stitches, for example a sweater. I’ll put a stitch marker in every 15-20 stitches. It makes it so much easier to count my stitches and make sure I haven’t inadvertently lost one or picked on up.
I use locking stitch markers on the held stitches for the thumb in gloves and mitts. I put them in the first held stitch and the last held stitch. That way the stitches don’t disappear. I use crochet thread to hold the stitches.
Hi Amy,
I also like to use removable stitch markers when I catch an error a few rows back in my knitting , or even a dropped stitch. I place the marker through the stitch, and then I can fix the problem later when I have more time.
I like to mark the WS / RS of my worked when the pattern indicates. Comes in handy when the wrong or right side is not easily identified like garter, or seed stitch patterns. Removable markers are great for this!
I use a removable stitch marker to show “wrong” side; also to mark odd/even rows (“light” marker has 5 letters = odd rows; “dark” marker has 4 letters = even rows).
i use stitch markers, extensively! Not just as the above comments suggest but i also use them in a color coded fashion. On my flat knitting – first marker on WS is green (greenbacks was the influence on this choice) so purple is the first marker on the front side (because, at the time, that’s what i had) Red markers designate the right side of the flat piece and yellow (lemon) designate the left side. I’m very visual and the list goes on. If i run out of yellow i use orange (basically citrus colors for the left and then blues and purples for the right. I’ve found having a system keeps me from straying from the pattern too often – particularly with many wips.
I recently found a how to video that used removable stitch markers when making socks. Just before starting the heel flap they inserted a marker to lessen the tension between the heel flap and instep stitches.
I use the small, plastic-covered paperclips you can get in bulk and different colors. as others have mentioned, I use different colors for start of round or start of RS row, etc. You can spread the clip end a bit to slip over a stitch, or put them on the needle.
Best of all, I can use them as row counters. If I am doing something where I have to increase every so many rows, I make a chain of them at the increase point that equals the number of rows without an increase and hang it on the one marking the increase point. So, if I’m to increase at each end of every fourth row, I will start with a total of four at one end, and only one at the other end. Then, as I complete each no-increase row, I move one paperclip to the other end of the row until I’m down to one at the end that started with four. I now know that it is time for an increase row. When I’ve finished the increase row I move the whole chain except for the one on the needle over to the other on-the-needle clip. This is especially helpful when working in fine yarn in a tight gauge with M1 increases that are hard see.
I mark an error I need to frog to so I can fix it