Traditionally, Lopi sweaters are straight up and down through the body, with no waist shaping to nip in just a bit at the smallest part of a body. Some designers are adding just a bit of waist shaping—you can find very gentle shaping in Ysolda Teague’s Strokkur pattern (shown above), for example. If you are making a Lopi sweater for a woman and would like to add some waist shaping rather than sticking with the traditional straight body shape, that is very easy to do!
A typical Lopi sweater is about 16″ from the hem to the underarm, and a general guideline is that you want the narrowest part at about the mid-point. Of course, this is just the average; everyone is built a differently so you may want to adjust that. Generally speaking, though, this will work for most people, particularly if you’ve got some ease built into your sizing.
Take note of your gauge after you’ve washed and blocked your swatch. The numbers here are based of a gauge of 4.5 stitches to one inch, or 18 stitches to 4″, which is typical of a sweater worked with Léttlopi or a worsted-weight yarn. At this gauge, it will be sufficient to work three decrease rows, with four decreases per decrease row; that will bring in the waist by about 2.75″ total. You will work straight for a bit at the waist, and then increase three times, returning to your original number of stitches. Here’s a diagram demonstrating what the overall waist shaping will look like—read on for more instructions.
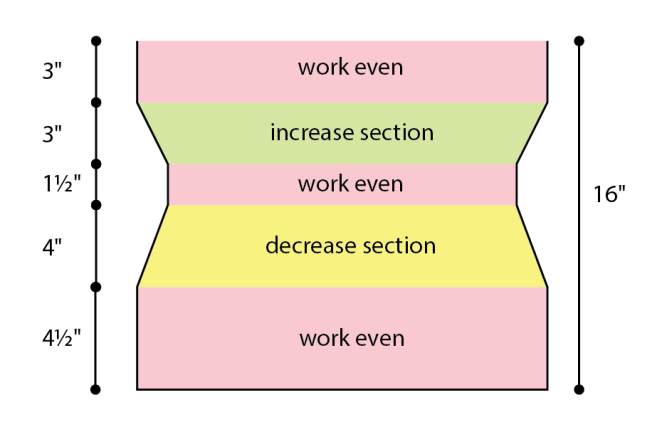
Start off by working even (i.e., without any decreases or increases) until your body piece measures about 4.5″ from the cast on. This is a good place to adjust if your sweater is longer or shorter than 16″ from hem to underarm, or if you are high-waisted or long-waisted.
Place a marker at the halfway point; for example, if you have 200 stitches on your needle, place a marker after stitch 100. Now you have your beginning-of-round marker at one side (where the seam would be if you weren’t working in the round), and your new marker at the other side.
Work your first decrease round as follows: K1, k2tog, work to 3 stitches before your side marker, SSK, k1, slip marker, k1, k2tog, work to 3 stitches before the end of round, SSK, k1. You have decreased 4 stitches.
Repeat the decrease round about every 2″, two more times. That works out to every 12th round at a typical gauge. When you’re done decreasing, you’ll have 12 fewer stitches than you cast on (6 of the decreases on the front, and 6 on the back).
Work about an inch and a half even at the waist.
Now it’s time to start increasing: K1, M1R, work to 1 stitch before your side marker, M1L, k1, slip marker, k1, M1R, work to 1 stitch before the end of round, M1L, k1. You have increased 4 stitches.
I like to make my increases at a slightly faster rate than my decreases, so I would work two more increase rounds spread out every 1.5″, or roughly every 9th round. If you don’t like odd numbers, maybe every 8th or 10th round… but when we’re working in the round, you can do your shaping on odd rounds without having to worry about increasing or decreasing on wrong side rows.
When you are back to your original number of stitches, you should have about 3″ to work straight before you reach your underarm.
That’s all there is to it! If you’d prefer more gentle waist shaping, or if you’re working in Álafosslopi with a chunky gauge, feel free to leave out a decrease round, just remember to leave out the corresponding increase round (that is, if you work two decrease rounds instead of three, only work two increase rounds).
