One of the questions that has come up this week in our Ravelry discussion thread of the Berroco Remix® Light KAL is about the short-row neck shaping in Derecho. Besides technique questions about how to “wrap and turn,” at least one participant was wondering, why are we even doing this? It’s a great question!
First, why do we include neck shaping in any of our sweaters? This might be obvious to some, but in case you’ve never thought about the way your neck fits into your torso, let’s think about that now. In the back, your shoulders make a fairly straight line across your back neck. But in the front, your neck fits in on an angle. If the top of your sweater goes straight across, that can feel pretty annoying on the front of your neck.
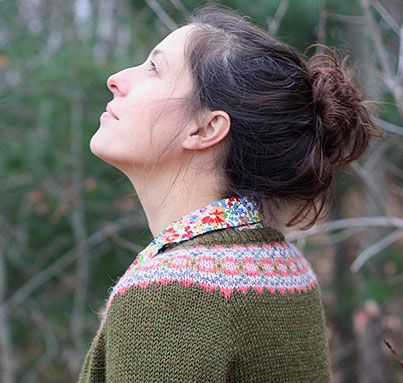
From a comfort standpoint, circular yoke shaping will avoid that choking feeling—here is an example from a previous Berroco KAL project, Agave, which has no neck shaping.

As you can see, the front neck dips down anyway, which is a function of the circular construction. The patterned yoke here illustrates that if you stopped knitting earlier, for example after the row of red diamonds, you’d get a deeper curved neckline.
But in the back, you have the same curve, instead of having the back neck higher than the front.

Visually, I prefer to have the back neck raised up for most sweaters, so that it covers more of my upper back. Particularly for a sweater intended to be worn in colder weather, I’d want the back neck to be higher for warmth.
So that is why short-row neck shaping is included in many circular yoke sweaters. Sometimes I even add some short rows in if the pattern doesn’t call for them! You can either work them close to the neckline, like in Derecho, or you can work them further down the yoke to avoid interfering with your colorwork, as in the Ellen cardigan:
Of course, you are always free to skip those pesky short rows if you don’t mind having the back neck dip down equally with the front, like in Agave. That’s the beauty of knitting—deciding how you want to make a pattern work for you!
Have other questions about Derecho? Feel free to leave them as a comment here, or post the question to the Ravelry group!

Wow this is helpful. Maybe other little things for us newbies. For example you pick up the wrapped stitch the knit it (or purl) it when you get to them then knit (purl) 2 etc. final time you knit to end of row but don’t you need to do the same to that last purl wrap? The directions don’t remind you to that. If you don’t there’s a gap. Hopefully I did that right. This is a fun project.
I just added German short rows to a bottom up circular sweater to raise the back of the neck about one inch. I find German short rows very easy to work because the technique is the same for knit or purl stitches and they look very smooth in the fabric.
Very helpful.
Amy,
After a late start on May22nd have reached “Place markers for front and back shaping” a) have a marker at each side edge and a marker at centre back but do not know where the next row should begin
b) is shaping necessary?
hi Norma,
When you Divide for Body and Sleeves, in that row we placed a new beginning of round marker at the right underarm (please note, we have corrected the pattern which originally mis-identified right and left sleeves in this round). You’re replacing the beginning of round, so you don’t need the marker at the center back anymore. Just the two side markers.
You’re welcome to skip the waist shaping if you don’t want to include it – that is totally your own call based on your own preferences! Please note, however, that the way the pattern is written, the hips have more stitches than the bust (there are more hip increases than waist decreases), so if you skip the shaping, you will have a different number of stitches for the hem. This won’t be a problem, I’m just pointing it out in case the numbers trip you up later in the pattern. As long as you have your side markers dividing the front sts from the back, it won’t matter.
o.k. checked back – missed the direction re new start position. Am wider in the hip so will skip the shaping. Remix Light is a pleasure to knit with. Using the same pattern, what yarn would you recommend for a finished item with more body?.
My math skills are lacking – so please help
following size 40 – end of inc row 2 = 232 stitches
inc row 3 = 25 stitches increase for each K5,yo,(k4, yo ) 6 times
repeated to end of row
an increase of 50 stitches = 6 stitches short of ending total of 288
is this correct?
hi Norma, I know that third increase round is a little tricky. Each repeat of “K5, yo, [k4, yo] 6 times” uses 29 sts (4×6, +5), and increases 7 sts. So, you’re able to repeat that whole thing 8 times around (232 divided by 29 = 8), which means you are increasing 56 sts in the round (8 x 7). 56+232=288.
Hope that helps!
Will try again the third time – not sure that this R.light is too happy with all this frogging.
Using the same pattern, what yarn would you recommend for a finished item with more body?.
hi Norma, Sorry I missed your question earlier. Most DK weight yarns will work well with this pattern. My choice for a substitute would be Berroco Corsica.
despite the start overs,I am thinking ahead and will use your suggesting of Corsica
found the mistake! thought the 6 times referred to what was in the ( )
then repeated from * around the row
thanks
Please help. I’m making a size xs. After increase rnd 1, I only have 154 stitches, not 174. What am I doing wrong?
hi Angela, it’s hard to know what’s going wrong without seeing your knitting. If you started with the correct number of stitches (116), doing “yo, k2” around will result in 174 sts. So the first thing is to make sure you’re starting with the correct number of stitches. Next, as you’re doing the increase row, it’s a good idea to stop every once in a while and go back to check and make sure you have 2 sts between each yarn over (no more and no less!). It’s possible that while you’re working that row you could be accidentally working an extra stitch or two between yarn overs, or just missing some of the yarn overs. The nice thing is, yarn overs are pretty easy to see in your knitting, so if you check yourself every 20 sts or so, you won’t have to go back too far if you miss some.
Thanks everyone for the replies! I tinked this row 8 million times and finally dropped in at my yls (aka Disneyland of my town) and problem solved! I was counting the stitch following the yo as part if the yo instead of as an independent stitch. That’s why my count was off. I love local yarn shops!!
Ah, yes, that explains it! Local yarn shops for the win!
Hi, I am making Nadia from booklet 376 and it has short rows so I am thrilled to find this discussion! But I am still stuck. I have joined the arms and started row one of the short rows. The pattern reads for me to knit the stitches of the first sleeve, wrap and turn but then purl the remsinder of the stitches. But when I wrap and turn then work to purl those stitches the next stitches to purl are the sleeve stitches that I just knit. What am I missing?? I have tried this a dozen times and watched every YouTube video available but I am still stuck….
Hi Margie,
Just to make sure I’m understanding where you are in the knitting, you’ve joined the sleeves to the body and worked at least 1 round even? (That’s the very last instruction of the Joining Rnd paragraph.)
If I’m interpreting that correctly, you’ve knit somewhere between 49 and 64 stitches of the left sleeve, and have worked a wrap, then turned the piece. Then, row 2 of short-rows, you’re purling the stitches of the sleeve, the stitches of the back, and then the stitches of the right sleeve. “Row 2 (WS): P169(174-189-193-206-211-216-239) [49(49-54-53-56-56-56-64) sts of sleeve, 71(76-81-87-94-99-104-111) sts of back and 49(49-54-53-56-56-56-64) sts of second sleeve], w&t.”
So I think the answer to your question is you’re doing it right—you will be working back over the stitches that you just knit, but purling to maintain the stockinette fabric. This blog post talks a bit about how short rows work, and that you’re just working extra rows in a small part of the fabric to make that fabric slightly longer—in this instance, you’re raising the back neck.
I’ve been trying to figure out how to post on the KAL group in ravelry. so I am just taking a shot at posting here. I’m at the very bottom and don’t understand about picking up stitches on bottom I’m sort of paralyzed because I don’t understand how this works around the bottom. you just knit down the side and then up and it works out?
hi Liz, I’d be happy to help. I have some follow up questions about your question so I will email you directly.
– Alison
Hi Liz,
I responded to your message on Ravelry, but in case anyone else has a similar question, I’m repeating what I said in Ravelry.
You’re picking up stitches along the edge of the rows that were worked even (without short-rows; after Row 2 of Shape Back Hem). This creates a smooth edge between the front and back—you can kind of see it in this photo. After you’ve finished working the short-rows, ending with a wrong side, you turn the work and knit across the back. Then you insert your right needle tip into the stitch along the side (perpendicular to how you’ve been working) and knit that stitch. Work that five more times until you are back at the part where you divided for the front and back.
I’ll try to get a video of this later this week, but I’ve got a little more knitting to do on my Derecho before I’m at that point.
Hi!
I want to knit yoke pullover.Could you, please tell me how to calculate and where to start and finish short rows?
hi Elena,
Most of Berroco’s yoke patterns already include instructions for short rows, so if you’re knitting a non-Berroco yoke pattern and want to add them, you might want to look at some of our patterns as an example. What I normally do is start off by going a couple inches past where the sleeves join on the front, and add a few stitches every time, usually about 4-6 times on each side.
I love this sweater. The neckline is very flattering. I’ve made it twice. I would like to see more sweater patterns with this short row feature. Since I am mathematically challenged, it’s easier to follow a designers plan than try to figure one for myself !!!
This is SUCH a useful article thank you! I know I am years late to the party but thanks for explaining this. I knew it all but I needed to see someone else writing it!