Our Mrs Watson Knit-along continues! There’s still time to join in the fun—we’re working on this until March 15 and some knitters finished their shawls in 2 weeks or less, so join the fun. A couple of people have asked about making this shawl a little bit bigger, so today I’m going to share two methods for making a larger Mrs Watson shawl.
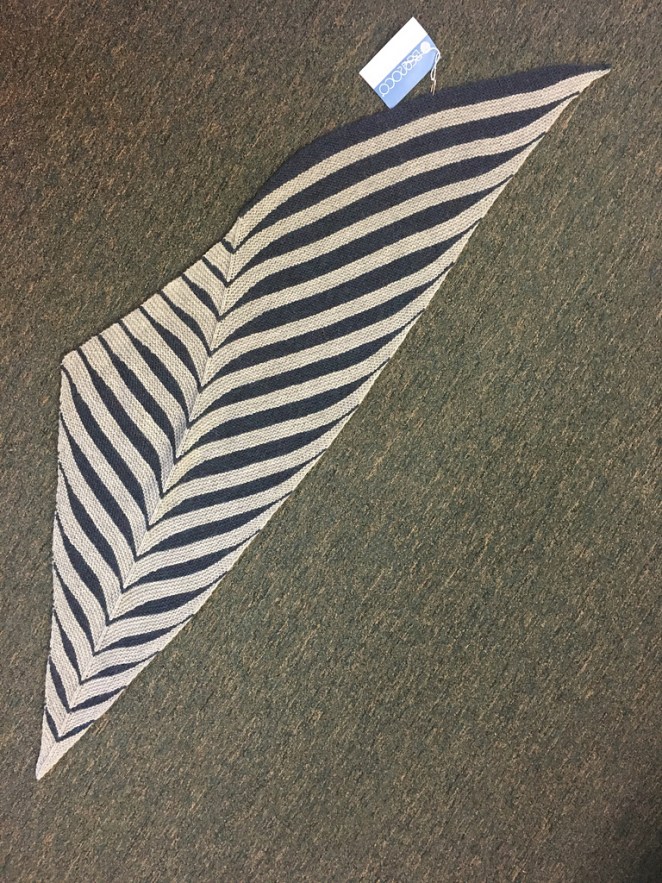
To begin, let’s look at the measurements as stated in the pattern. The finished pattern in Ultra Alpaca Light does come out to 66″ long and 20″ wide, knit in Berroco Ultra® Alpaca Light. This yarn is listed as a DK-weight yarn, but personally, it knits up at a light DK or heavy sport weight. Here’s a photo of the finished sample in Ultra Alpaca Light for reference.
The easiest way to make Mrs Watson larger is to use a heavier yarn. I’m knitting my Mrs Watson in Berroco Inca® Tweed, which is a bulky weight yarn. I’m knitting mine on a size 10 needle; if you choose to use a heavier yarn, you will need to change your needle size as well. Start with the needle size recommended on the ball band, but this is a good time to make a quick swatch to ensure that you like the fabric that you get—you may find that you need to go up or down a needle size.
The second way requires a bit more thought, but is still fairly easy. Take another look at the photo of the finished Mrs Watson above. You cast-on at the tip on the far right, increase every other row until you get to the widest point (the first half of the shawl), and then your stitch count remains the same until the very end (the second half of the shawl).
To make Mrs Watson larger while using the same yarn (or a similar DK weight yarn), you’ll need to work some additional repeats of the leaf patterns in both halves of the shawl. 
If you look at the photo above, the circle at the far right shows you where the very first leaf pattern is worked. The center circle indicates the point at which you stop increasing, after having worked 8 total leaf patterns (counting the first one at the far right and the leaf pattern circled in the middle). The circle at the far left shows the last leaf pattern worked, near the end of the second half of the shawl—there’s another 8 leaf patterns, not counting the center leaf pattern.
So the pattern is essentially broken down into 8 leaf patterns that include increasing stitches, and 8 leaf patterns that don’t increase the stitches. If you work additional leaf patterns in the first half to achieve a larger stitch count (making a wider and longer shawl), you’ll need to work additional leaf patterns in the second half to balance out the shawl.
Every time you work a section of Body Pat 1 and a Leaf Pat in the first half of the shawl, you’re increasing 12 stitches. Remember that short-rows do not increase or decrease stitches, they simply create additional rows within the body of the fabric. Following the pattern as written, you stop increasing when you have 109 stitches. But if you work, say three additional section repeats in the first half of the shawl, you’ll end up with 145 stitches.
You can easily add repeats of any of the Leaf Patterns. If you want to add 3 repeats and really balance things out, simply work one additional repeat of Leaf Pat 1, Leaf Pat 2, and Leaf Pat 3 than the pattern states (for example, pretend that the pattern says “Work Rows 1–10 of Body Pat 1 and Rows 1–14 of Leaf Pat 3 four times more.”)
You’ll need to balance out the second half of the shawl in the same way. For example, once you start working Body Pat 2, you could work Rows 1–10 of Body Pat 2 and Rows 1–16 of Leaf Pat 4 four times more (instead of three, as stated in the pattern), and then work Leaf Pat 5, Rows 1–10 of Body pat 1, then repeat Leaf Pat 5 and Body Pat 2 again, and do the same repeat for Leaf Pat 6.
If you want to knit a larger Mrs Watson using this method, I recommend taking some time to “map out” the pattern and identify where you want to work additional section repeats. Keep in mind that we’re defining sections as Body Pat and Leaf Pat combos. The pattern as written has 17 sections, beginning with the cast-on and ending with Leaf Pat 9.
Cast-on to last Leaf Pat 3—8 sections (109 stitches)
Body Pat 2 to last Leaf Pat 8—8 sections
Body Pat 2 through Leaf Pat 9 (bind-off)—1 section
So in our example, the larger Mrs Watson would have 23 sections:
Cast-on to last Leaf Pat 3, with additional sections worked in each Leaf Pat—11 sections (145 stitches)
Body Pat 2 to last Leaf Pat 8, with 3 additional sections worked in Leaf Patterns of your choosing—11 sections
Body Pat 2 through Leaf Pat 9 (bind-off)—1 section
Whether you’re upsizing your Mrs Watson shawl or knitting it as is, let us know how you’re progressing!

Thanks for this information…very helpful!😊
Thank you for these updated instructions for Mrs. Watson. Could you please address if there is an increase in yarn needed, using the original pattern if you increase the stitches to 145. Thank you for your help.
Hi Jerilyn,
I am not 100% certain but I would strongly suspect that you’d need to more yarn. I’m not sure how much yarn the original sample required, but my quick attempt at figuring this out tells me you’d need one more skein of each color if you worked an additional 6 sections/increased to 145 stitches.
The original pattern works for 19 sections and calls for 3 hanks of the Moonshadow color for an average of 6.33 sections/hank, so you should, in theory, be able to get 6 sections out of additional hank of Moonshadow.
I just love this pattern, i just started on worsted version, it just moves along so quick
sorry I missed the KAL but this pattern is definitely in my plans
I saw this after the KAL, but i love the shape of this shawl, this is definitely on my list
Could you tell me how much yarn I would need to knit Mrs. Watson in Berroco Ultra Alpaca Natural worsted yarn?