As I shared in last week’s KnitBits, I sometimes like to shape the shoulders of a sweater using short rows, rather than binding off the shoulders over several rows. This prevents the “steps” that you might see when doing the traditional bind off method, creating a cleaner line and also making seaming the shoulder a little easier. Today I’ll explain in more detail how you would convert a pattern written using the binding-off-over-several-rows method to the short-rows method.
For an example, I’m using the free Dory pattern. On the Back, the shoulder shaping instructions are as follows:
Shape Shoulders: Bind off 4(6-6-6-8-8-10-10) sts at beg of the next 2 rows, then 4(5-6-7-7-9-9-10) sts at beg of the next 4 rows. Bind off remaining 41 sts for back neck.
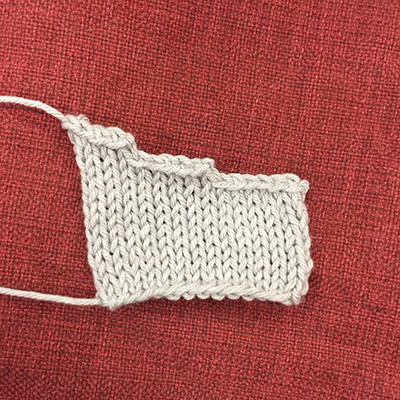
Working the pattern as written results in a “stepped” shoulder—you can see this in the photo. There’s nothing wrong with doing this method—it still creates a sloped fabric that sits nicely on the shoulders.
You can choose, however, to do the same pattern with short rows, for a gentler slope (see the photo at the top of this post). If I were working this with short rows, I would work to 4(6-6-6-8-8-10-10) sts before the end of the row, wrap & turn (here’s a helpful video), then do the same on the next (WS) row.
Then, on the next four rows, I would work to 4(5-6-7-7-9-9-10) sts before my last wrapped stitch.
Finally, on the last two rows, I would work to the end, picking up the wraps and knitting them with the wrapped stitches. Then I bind off normally.
On the fronts, it works similarly. Here are the instructions for the shoulder shaping on the Left Front:
Bind off 4(6-6-6-8-8-10-10) sts at armhole edge once, then 4(5-6-7-7-9-9-10) sts twice for shoulder
On the Left Front, in order to bind off at the armhole edge, you would be binding off with the RS facing. The slightly counterintuitive part is that you’re going to work your wrap & turn on the WS. I like to think of it like this: As you are working from the neck edge toward the armhole edge on the WS, if you had been doing the bind-off method, those stitches at the armhole edge would have been bound off—so I wouldn’t be working those stitches. Another way to wrap your head around it is, you want the outer edge of the shoulder (the armhole edge) to be shorter than the inner (neck) edge, therefore you need to work more rows on that inner/neck edge.
So, on the WS, you would work to 4(6-6-6-8-8-10-10) sts before the end of row, wrap & turn, then on the RS work back to the neck edge. On the next WS row, work 4(5-6-7-7-9-9-10) sts before your last wrapped st, then wrap & turn. Work to the neck edge on the RS, then work one more WS row, picking up your wraps. Then bind off on the RS.

The Right Front is the same except with RS and WS reversed.
One more tip: if you wish, you can leave your shoulder sts live on a holder, and then use a 3-needle bind off to join the shoulders. You could also use kitchener stitch to graft them, but on most sweaters I prefer to use the 3-needle bind off because the seam created with that method gives the garment more stability.

Looking forward to more helpful hints such as his one – perhaps with a video
Doing the shoulder short row decrease, do I do one side complete then the other side
It depends on your pattern and the neck shaping. Most often, on the fronts you would complete one side and then the other, because typically you’d have at least started your neck shaping before doing the shoulder shaping (you may have even completed the neck shaping, depending on the style of the neckline). On the back, often you won’t have any neck shaping, you’d just bind off the neck stitches after shaping the shoulders. So in that case you would do both sides at once (on alternating rows).