


Left to right: Cremini in Talara, Lovell in Modern Cotton DK, Meader in Hearthside
A sweater with an allover lace pattern can be oh-so pretty, but if there is any kind of shaping involved—and for a sweater, there usually is—it can be a little tricky keeping the overall pattern lined up. Lace knitting basically means working a bunch of increases (worked as yarn overs) and decreases, arranged in a decorative pattern. When you then add another set of increases or decreases to shape the piece, that’s a lot to keep track of. But don’t worry, we have some tips and tricks to help!
In stockinette stitch, if you make an accidental increase or decrease, you can usually get away with correcting the stitch count when you notice the mistake. If you’re off by a stitch when it comes time to divide for the sleeves of a sweater, a discreetly placed increase or decrease can make everything good again, even if you kept knitting for several inches before noticing.
But when working in lace, where it is easy enough to miss a yarn over and thereby accidentally changing the number of stitches, it can unfortunately be harder to hide a mistake, since it can shift the stitch pattern for an entire row.
And going back to fix things tends to be a little more involved in a lace pattern.
Put in a lifeline every inch or so and take the worry out of lace knitting. You can carry on with confidence, knowing if anything goes wrong, it’s easy to go back to the last lifeline and start fresh from there.
Use stitch markers. For a repeating stitch pattern, just place a marker in between each repeat, like this:

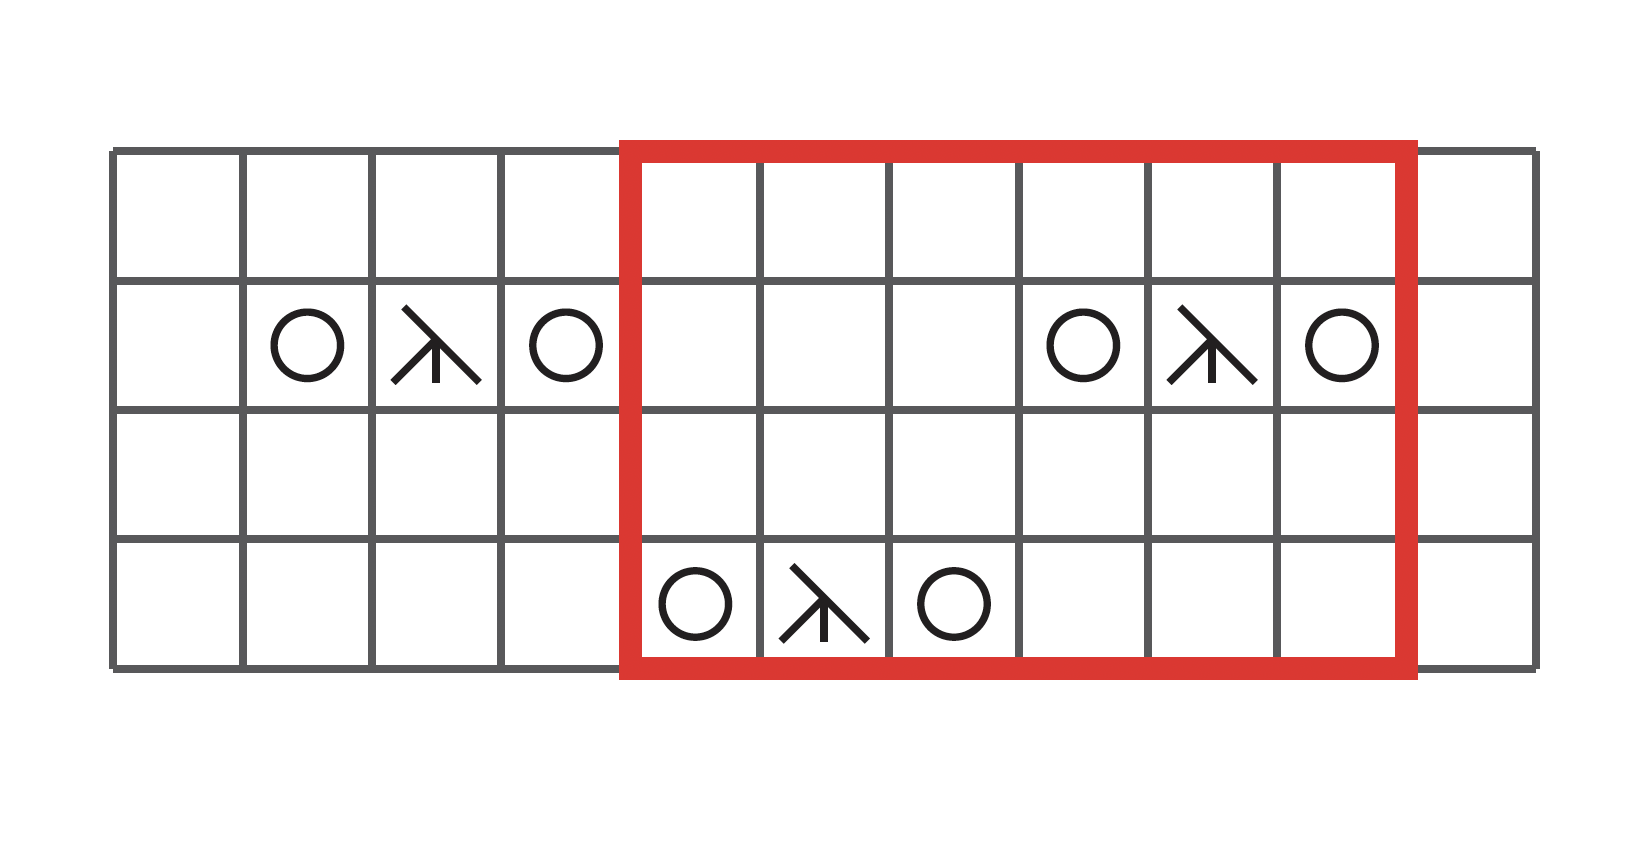
This simple lace pattern is a repeat of 6 stitches. If you notice the whole row is off by one stitch, you can easily check which section has five stitches instead of six. Missed a yarn over? You can add it on the following row in a pinch.
If there are a lot of repeats in your pattern and you don’t have enough markers, you can tie off little bits of scrap yarn to use as markers.
For simple lace patterns this works great. But then there are some patterns when the stitches don’t stay neatly inside the lines of the pattern repeat.

Let’s use the Cremini cardigan as an example. Here’s what the chart looks like:
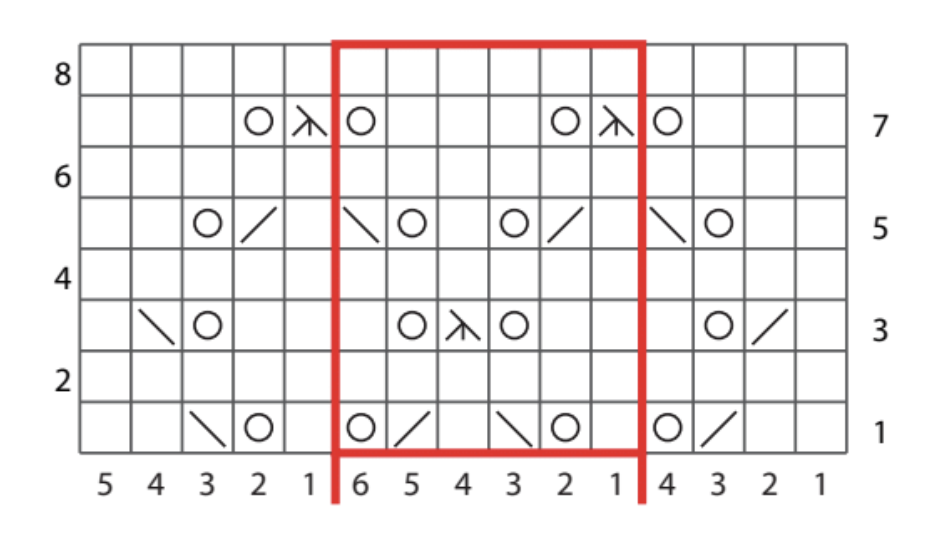
The repeating part of this pattern consists of six stitches, with five additional stitches at the one side, and four at the other. This centers the pattern across the body of the cardigan and leaves an edge stitch in stockinette stitch at each side throughout. (This edge stitch will make it easier to pick up stitches for the button band later.)
If you use markers like in the previous example, you will be fine through Row 6 of the chart. But once you get to Row 7, there is a double decrease right at the beginning of the pattern repeat. You will need to take one stitch from each side of that center stitch and decrease the three stitches into one. This means that if you placed a stitch marker between the repeats, your marker will be right in the middle of the stitches to be decreased.
No worries, each marker will just need to be moved over one stitch to the right before working this row. And there is no need to move the markers back afterwards – the yarn over just before the marker will have things in the right place for your next row. If you had not placed any markers, you would not even notice this!
Once you have worked through your pattern once or twice, you may find it works well enough to remove the markers and rely on your existing stitches to keep things lined up. (If so, it may be a good idea to place a lifeline at this point.)
As you work through the pattern, check your stitches at the end of the row, to make sure they line up with the same stitches from your previous pattern repeat. If the yarn overs should be stacked straight on top of each other, make sure they don’t start going at a diagonal, etc. This is called reading your knitting.
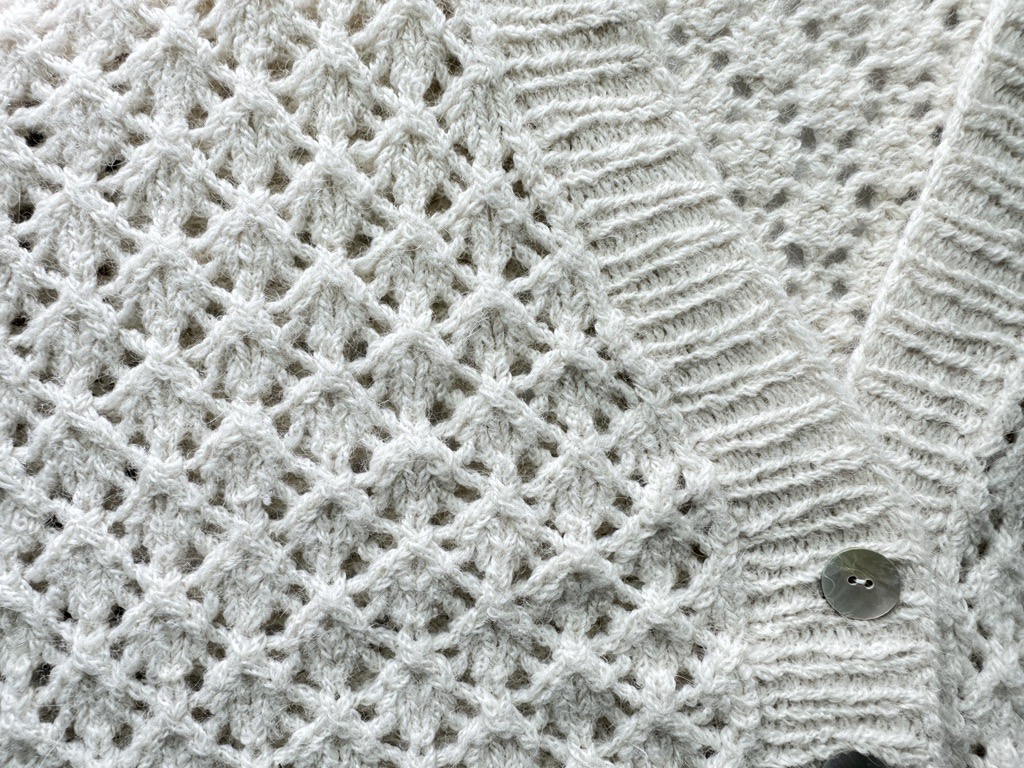
In the photo below, you can see that the double decreases are stacked on top of each other. You can follow the column of stitches straight up to see which three stitches need to make up the next double decrease.

The next tricky part is shaping in pattern. If you’re knitting anything other than a blanket or a scarf, you will probably need to do some shaping. (You might get away with a boxy drop shoulder pullover too.)
For the Cremini sweater, there is not too much shaping to be done in pattern. The armholes are worked straight up from the underarms and the slightly balloon-shaped sleeves, which are picked up from around the armholes, maintain the same number of stitches all the way down to the cuff. The part where things get a little tricky is at the front neck shaping.
The front edges have a decrease every 4th row, shaping the v-neck.
The instructions say to “work in pattern as far as possible”. So what does that mean?
Here, it can be helpful to use markers again. Place a marker at the beginning of the first full pattern repeat, and another after the last full pattern repeat. As you decrease, just move the marker over one full pattern repeat (in this case 6 stitches) any time you run out of stitches at the edge. All stitches inside the markers will be worked in pattern stitch just as before, so it is only the stitches at the sides of the markers that we need to worry about.
For the edge stitches outside the markers, the simplest thing to do is to keep them all in stockinette stitch. This works best for very short pattern repeats.
In larger patterns you’ll end up with noticeable patches in stockinette. For the best result, you need to work as much of the pattern as you can fit in the remaining stitches.
Work the first edge stitch, and then the decrease to shape the neck if needed, then see how many stitches are left before the marker.
If, for example, there are four stitches left, these can be worked as the last four stitches in the pattern repeat, if possible.
The most important thing is to not change the number of stitches. If the pattern stitch has an increase, there must also be a decrease and vice versa. If there are not enough stitches to do both, you should just leave the stitches in stockinette.
If there is a double decrease on the chart, but you don’t have enough stitches for it, you can make a single decrease instead. An SSK or k2tog should have one corresponding yarn over and a double decrease should have two.
When working partial repeats of a pattern stitch like this, it’s a good idea to count the edge stitches before and after working them, to confirm that the number of stitches did not change, aside from any intended decrease.
If you are shaping a lace pattern at the end of a row, any stitches after the last full repeat can be worked by the same principle. You would then work the edge stitches according to the beginning of the chart repeat.
If you are increasing in a repeating stitch pattern, place a marker outside the last full repeat, work any stitches outside the markers in pattern as far as possible, and then move the markers out toward the edge any time you have enough stitches for another repeat.
Don’t forget to look over your knitting at the end of the row. Remember that it is very easy to miss a yarn over (hello knitting group, movie night, kids, pets and zoom meetings!) so take the time to look over your work regularly.
Happy knitting!

Merci pour ces précieux conseils !